WhatsApp API Onboarding
STEP 1 - Set Up Your Meta Business Portfolio
Before getting started with WappCloud, ensure you have an active Meta Business Portfolio (formerly Meta Business Suite). This is required to connect your WhatsApp Business account.
How to Check or Create a Business Portfolio
-
Open your browser and navigate to business.facebook.com.
-
Log in with your personal Facebook account.
-
Check whether a Business Portfolio already exists.
-
If no Business Portfolio exists, create one using your personal Facebook account.
Note: You must use your personal Facebook account to create or manage a Meta Business Portfolio. A Business Portfolio is mandatory to complete the WappCloud onboarding process.
STEP 2 — Create Your WappCloud Account
Sign up for a WappCloud account to get started with the WhatsApp Business API.
Registration Instructions
-
Visit www.wappcloud.com and click the “Start Free” button.
-
Fill in the following registration details:
| Field | Details |
|---|---|
| Full Name | Your full legal name |
| Email Address | Will be used as your login credential |
| Phone Number | See notes below for phone number guidance |
| Password | Will be used as your login credential |
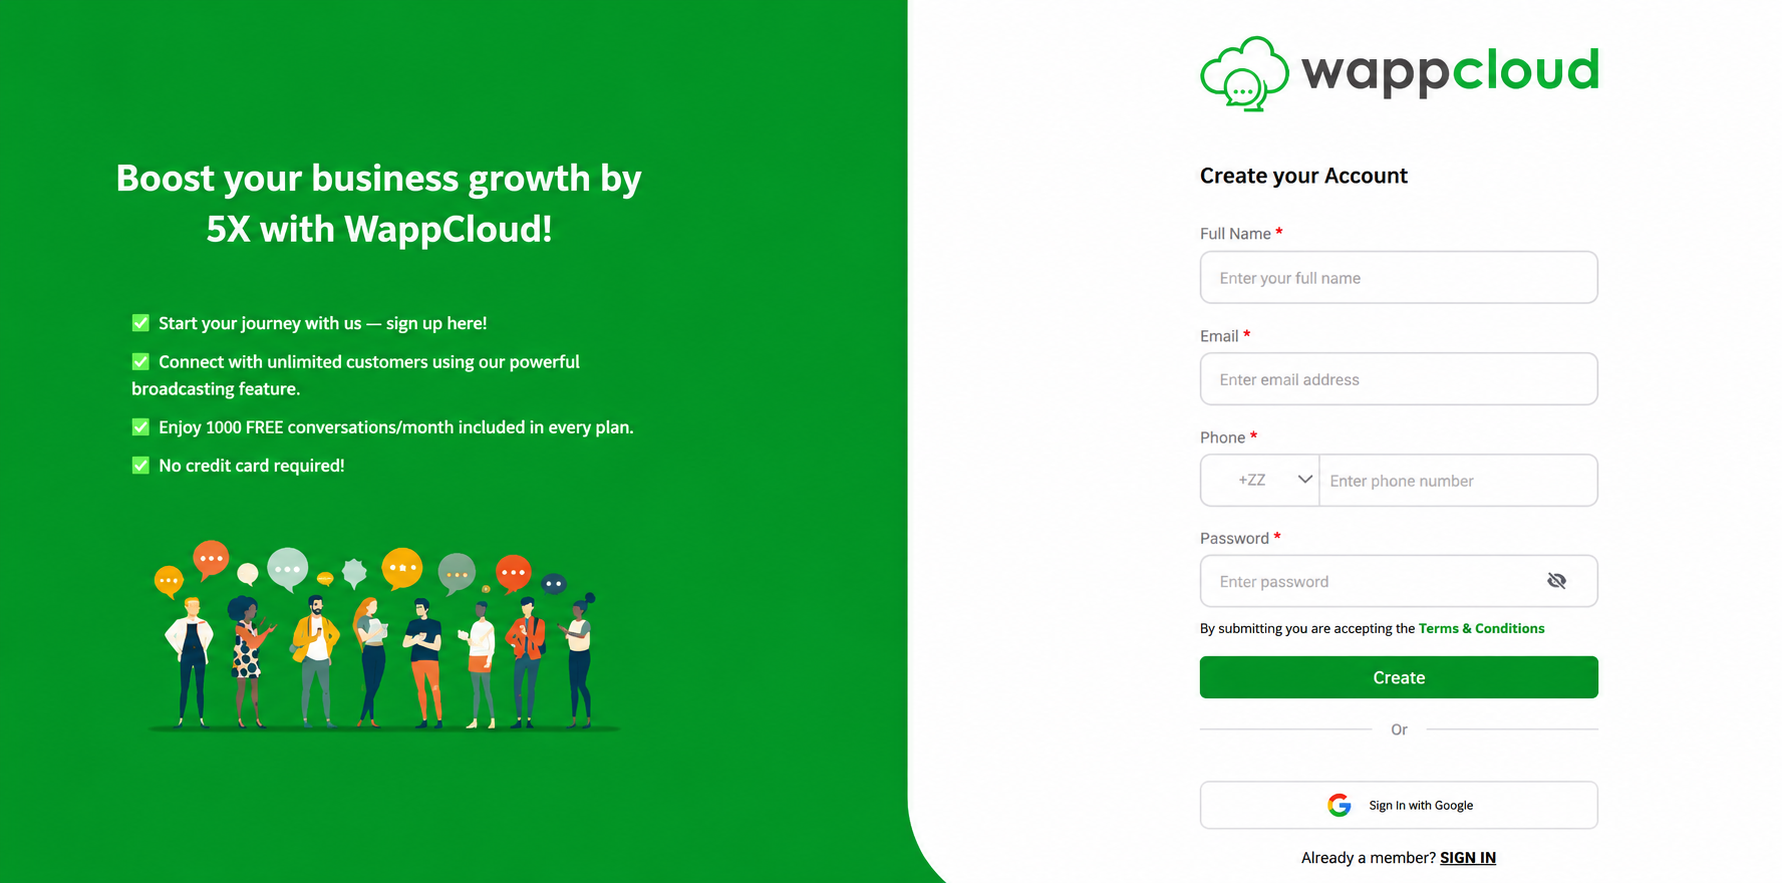
Note:
Option A: Connecting an existing WhatsApp Business App — use the same phone number registered on that app.
Option B: Connecting a new dedicated number — you may enter any valid phone number.
The email address and password entered here will serve as your WappCloud login credentials.
STEP 3 — Email Verification
After completing your registration, WappCloud will send a verification email to the address you provided.
Verification Process
-
Check your inbox for a verification email from WappCloud.
-
Click the verification link in the email to confirm your account.
-
Once verified, return to www.wappcloud.com and sign in using your registered email address and password.
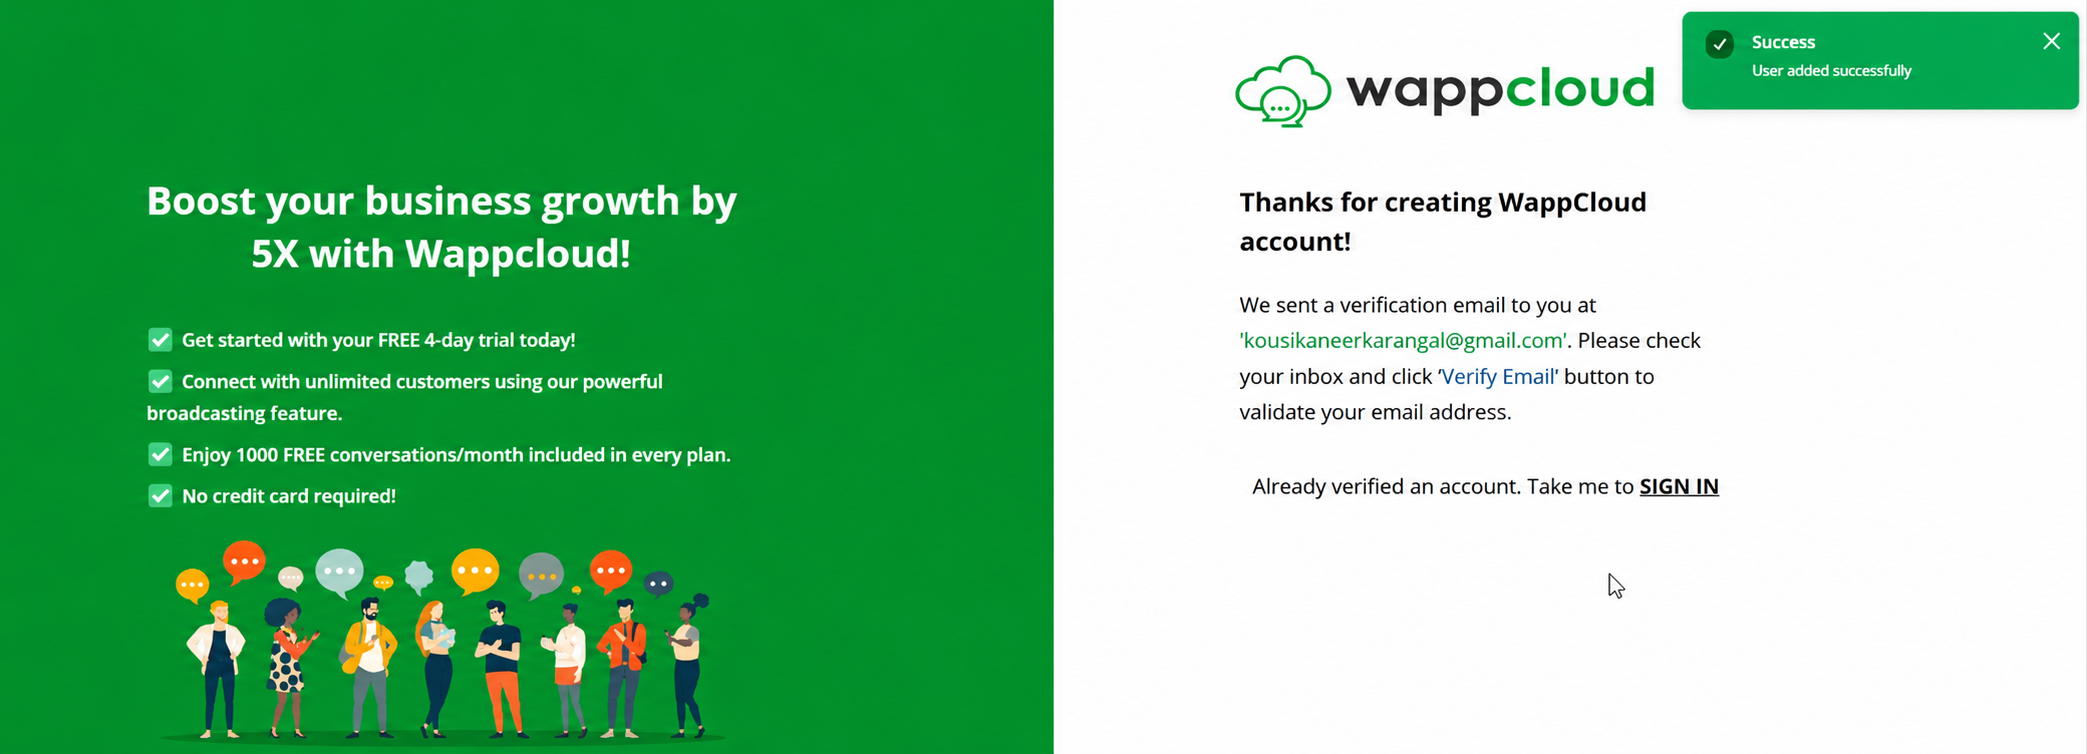
Note: If you do not receive the verification email within a few minutes, please check your spam or junk folder.
STEP 4 — Complete Your Business Profile
After signing in, you will be directed to the WappCloud welcome screen. Complete your business profile by entering the following details:
| Field | Details |
|---|---|
| Business Name | Your official business name |
| Category | The industry or category your business belongs to |
| Website | Your business website URL |
| GST Number | Optional — required for GST-registered businesses only |
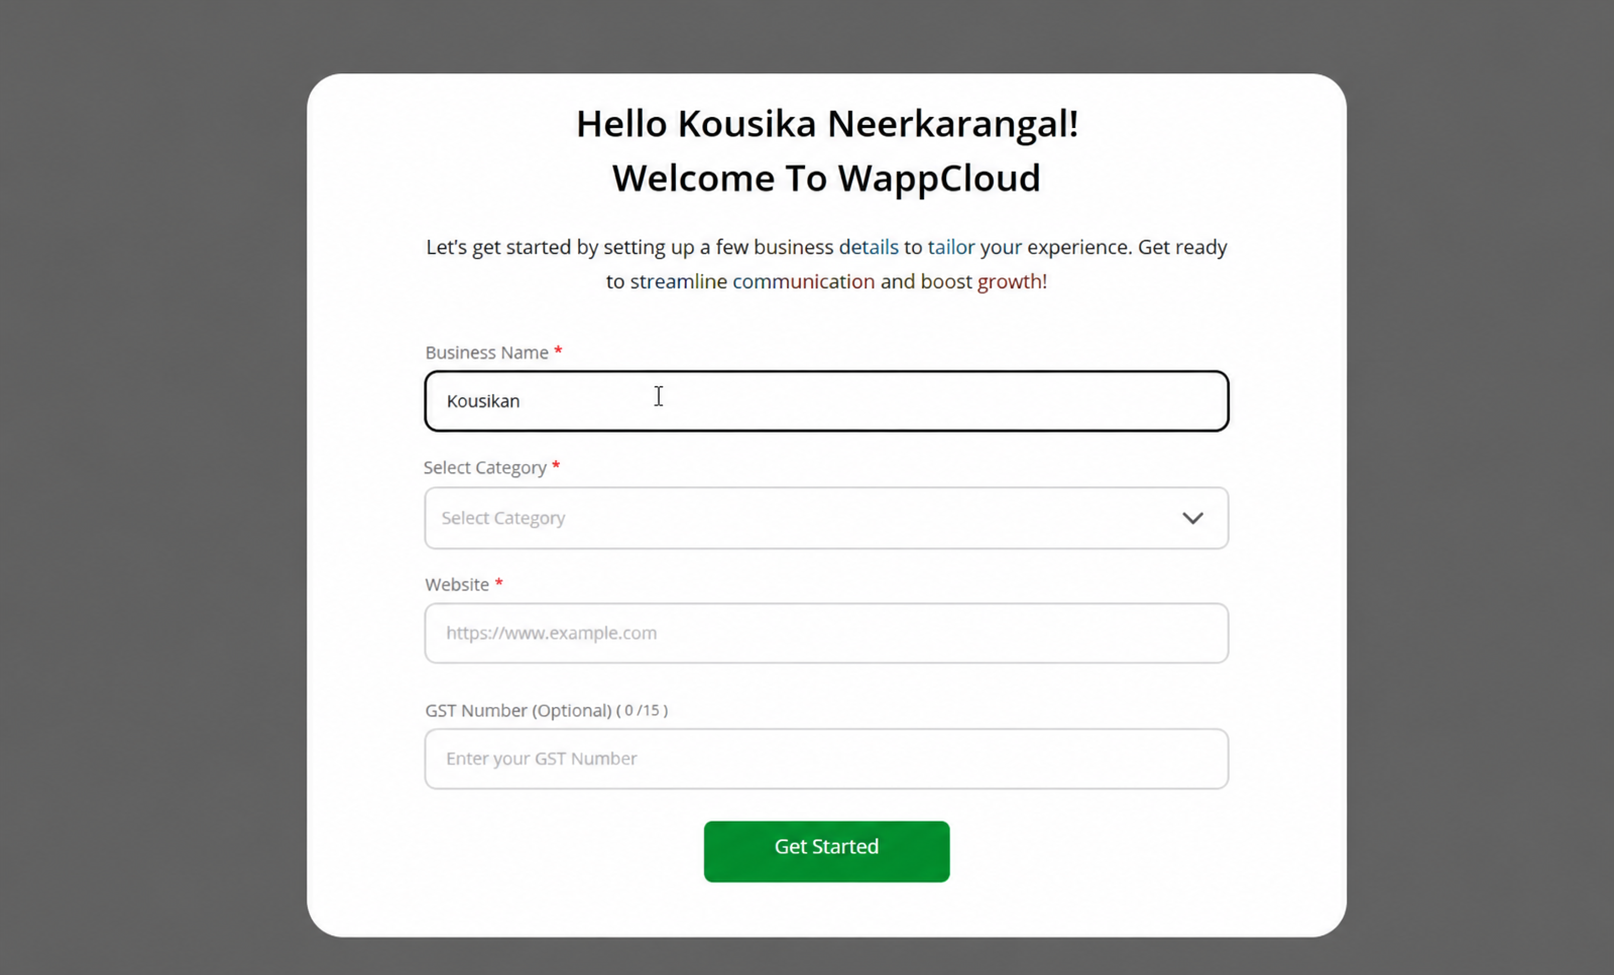
Once all details are filled in, click “Get Started” to proceed.
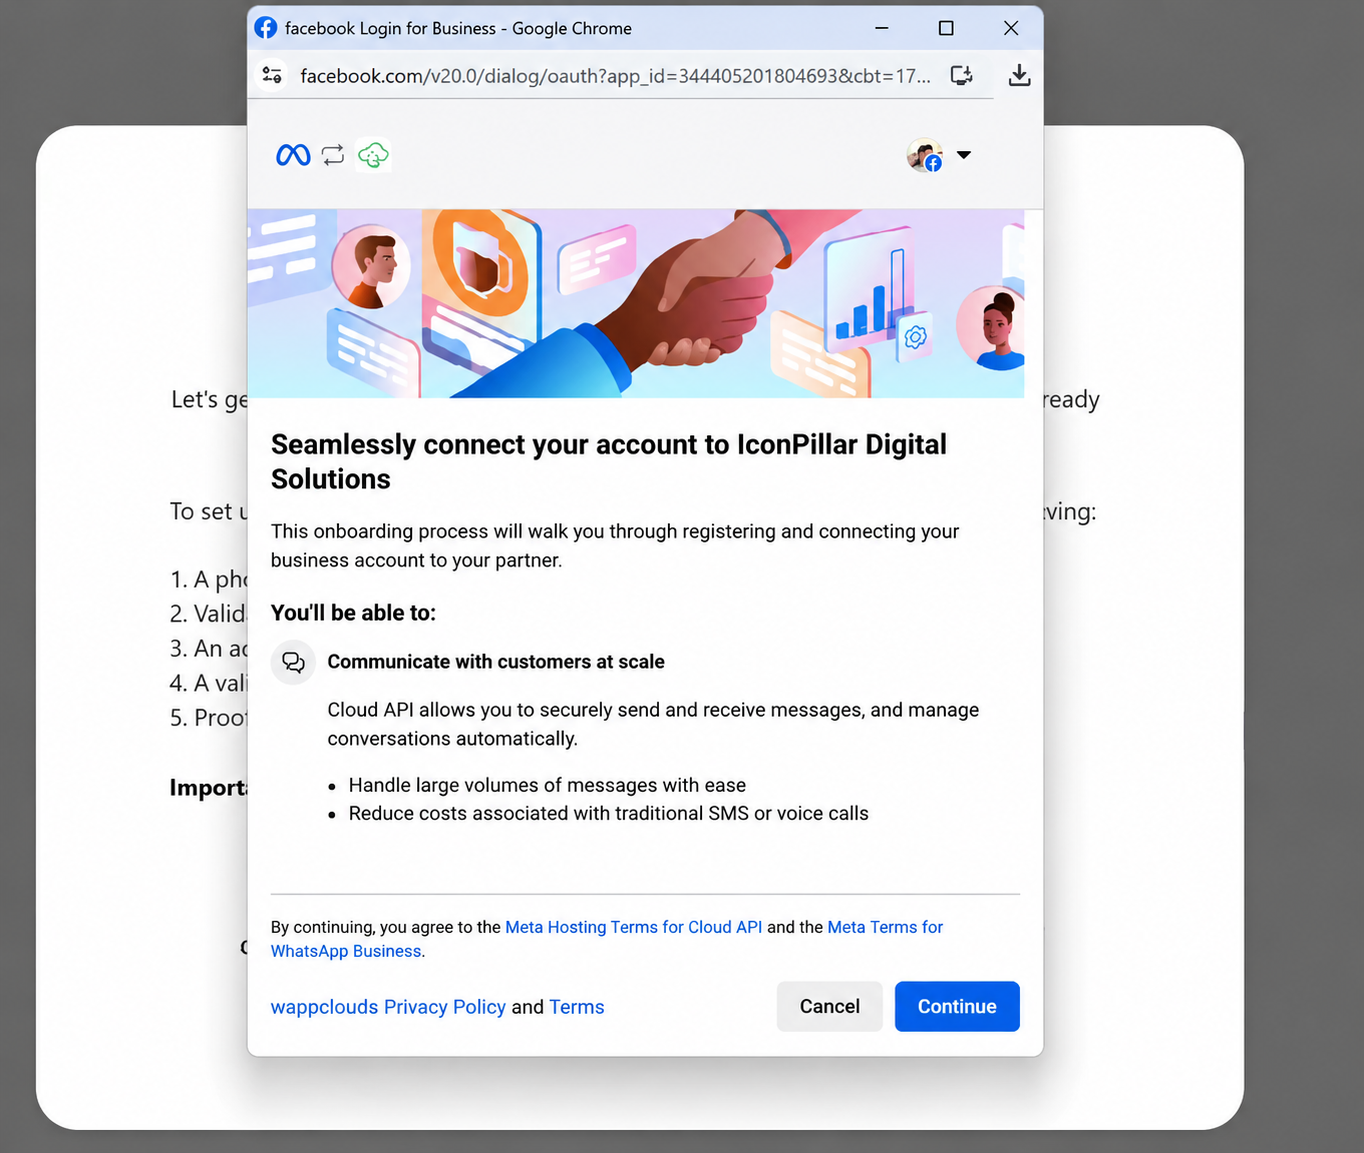
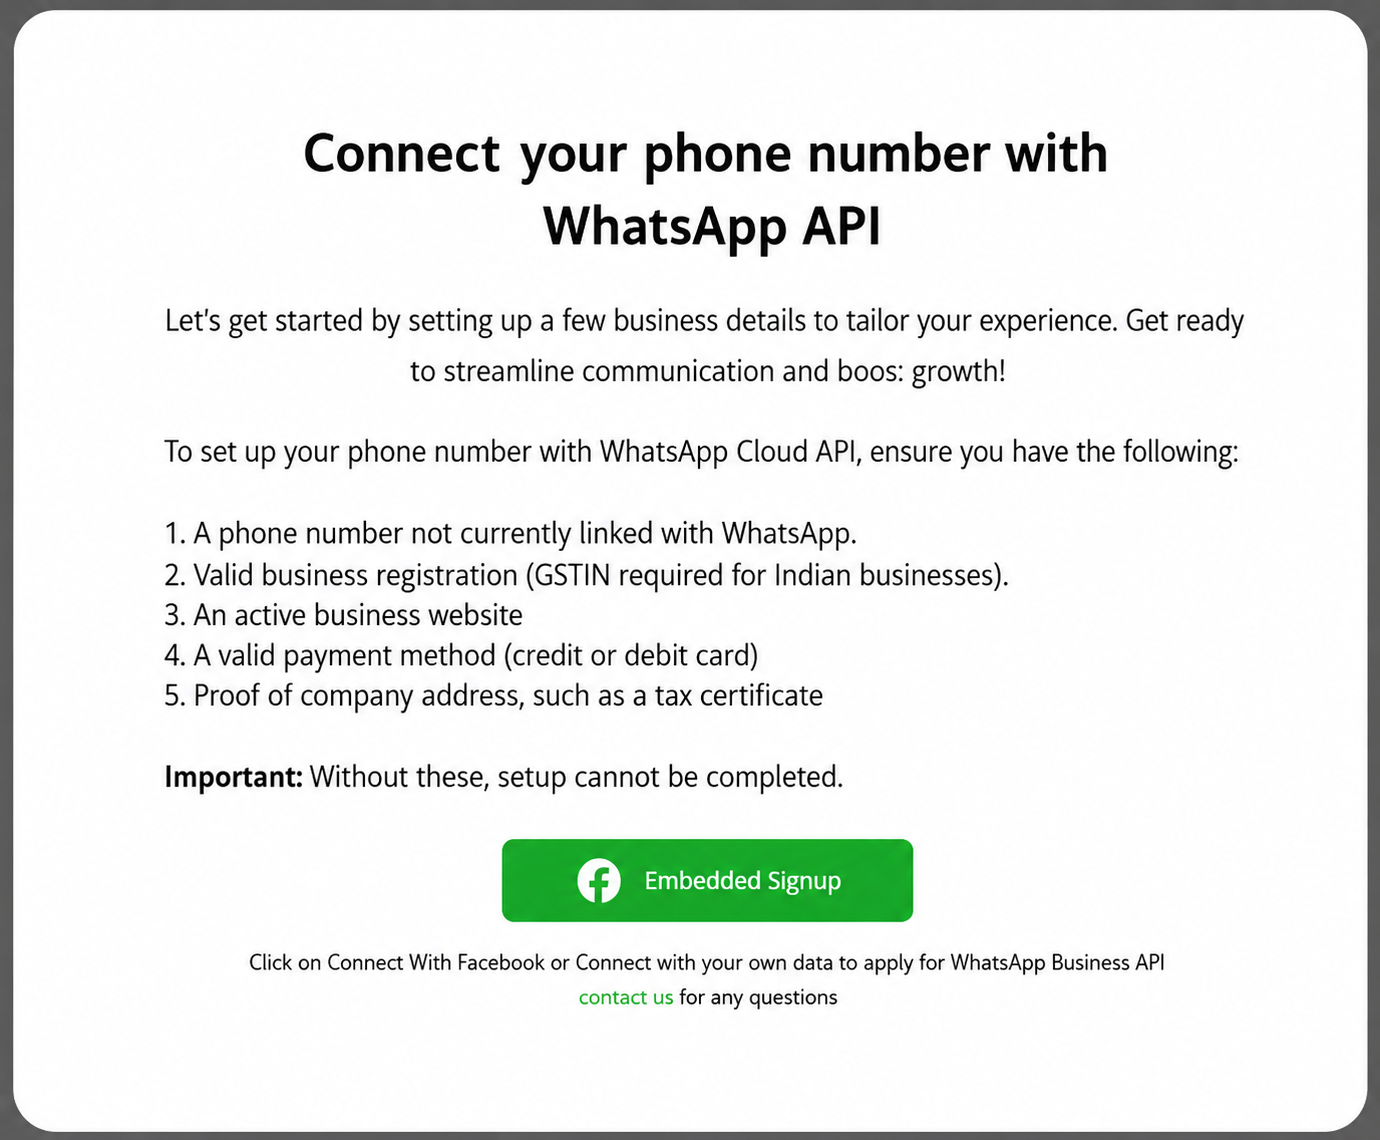
STEP 5 — Embedded Sign-Up — Connect WhatsApp Business
This step connects your WhatsApp Business account to WappCloud via Meta’s secure Embedded Sign-Up flow. Follow all ten sub-steps in sequence.

(i) Facebook Login & Business Connection
-
Click “Continue with Facebook” when prompted.
-
Log in using your personal Facebook account.
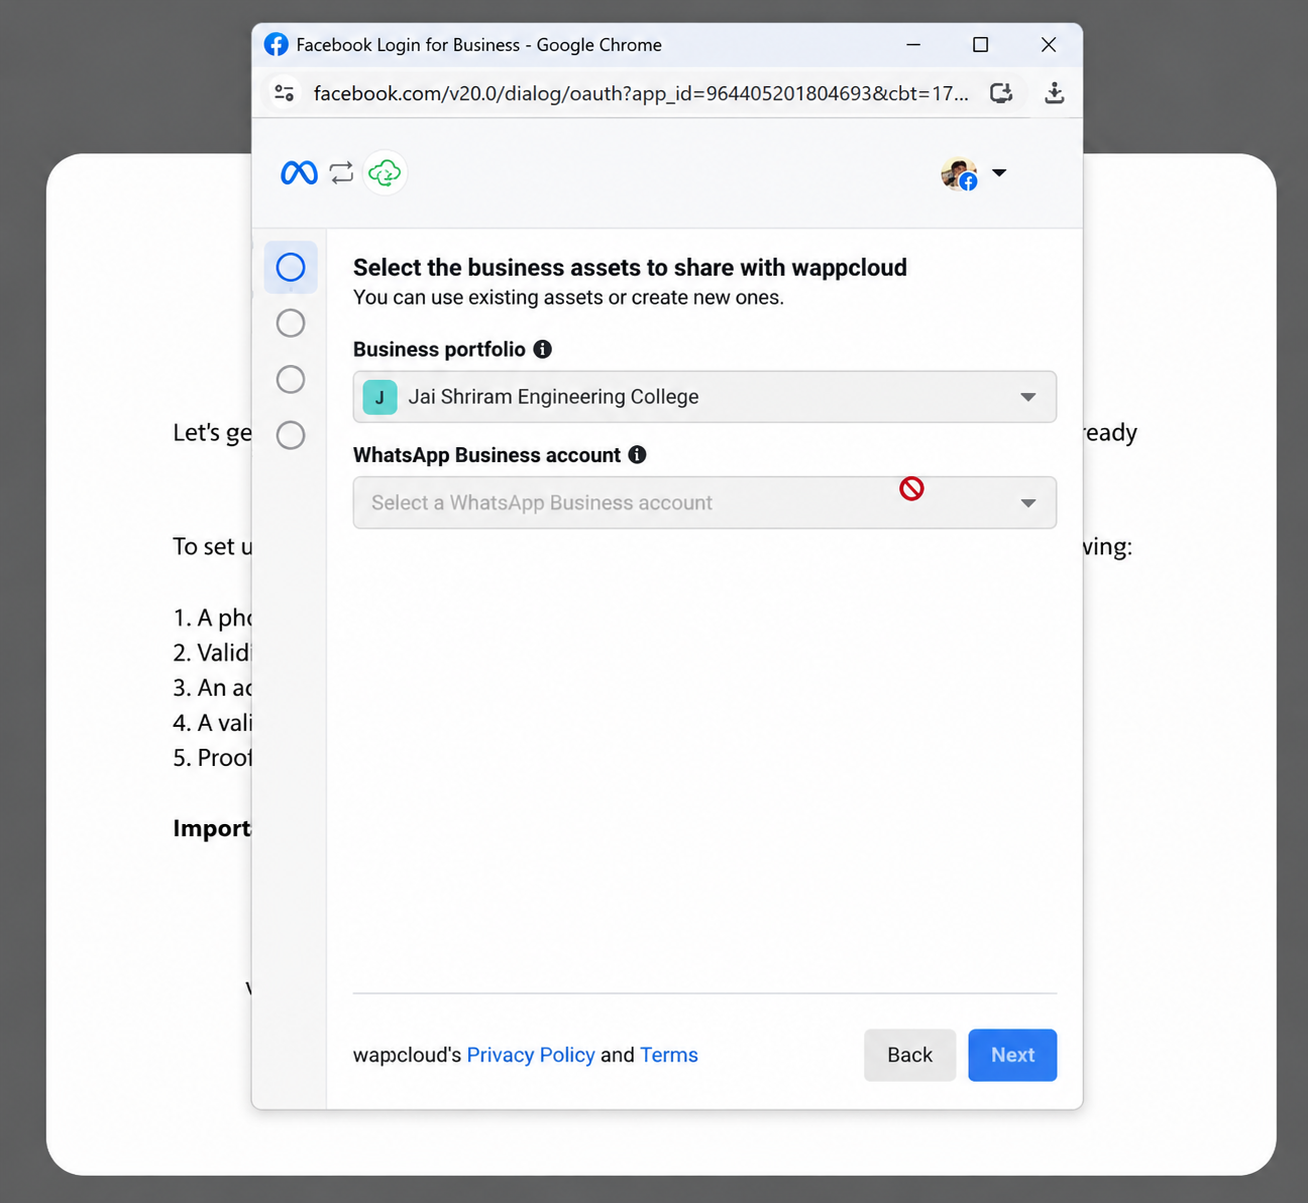
(ii) Select Business Assets to Share with WappCloud
-
Select your Business Portfolio from the dropdown menu.
-
Under “WhatsApp Business Setup Options”, choose one of the following:
-
Create a new WhatsApp Business Account
-
Connect an existing WhatsApp Business App (for accounts already using the WhatsApp Business App)
-
(iii) Enter Business Information
Fill in the following details for your WhatsApp Business account:
| Field | Details |
|---|---|
| Business Name | The name visible internally within Meta Business Suite |
| Category | e.g., Charity, Retail, Services, etc. |
| Country | The country where your business is registered |
| Website | Enter your business website URL |
| Time Zone | Your business operating time zone |
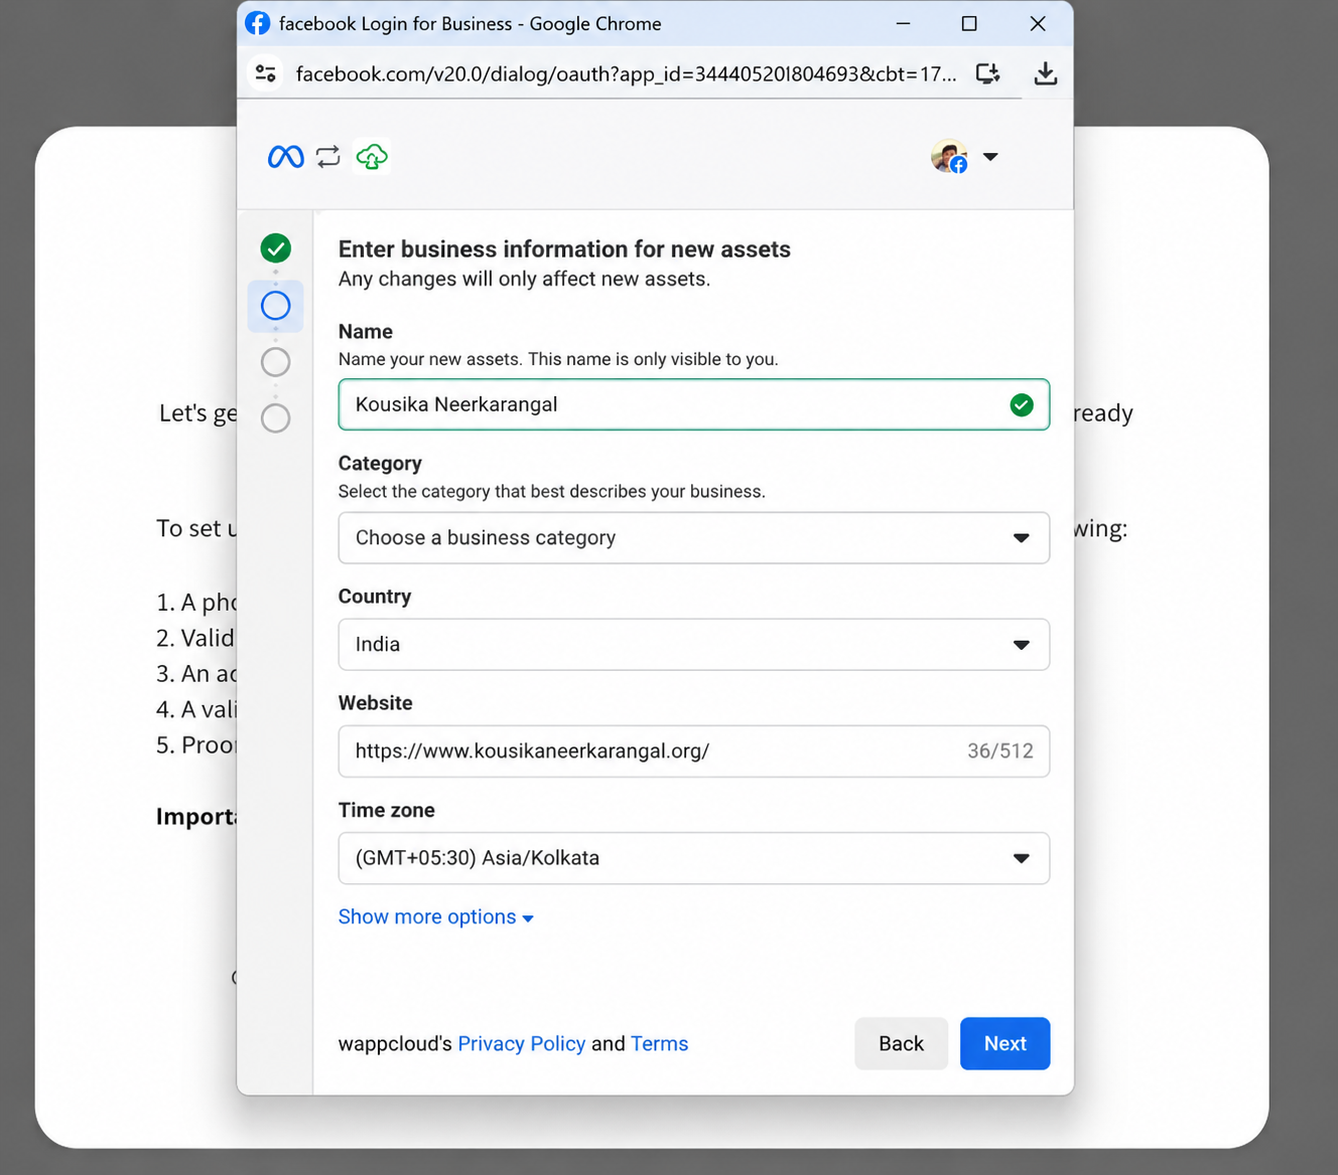
After completing all fields, click “Next” or “Continue” to proceed.
(iv) Add Your WhatsApp Phone Number
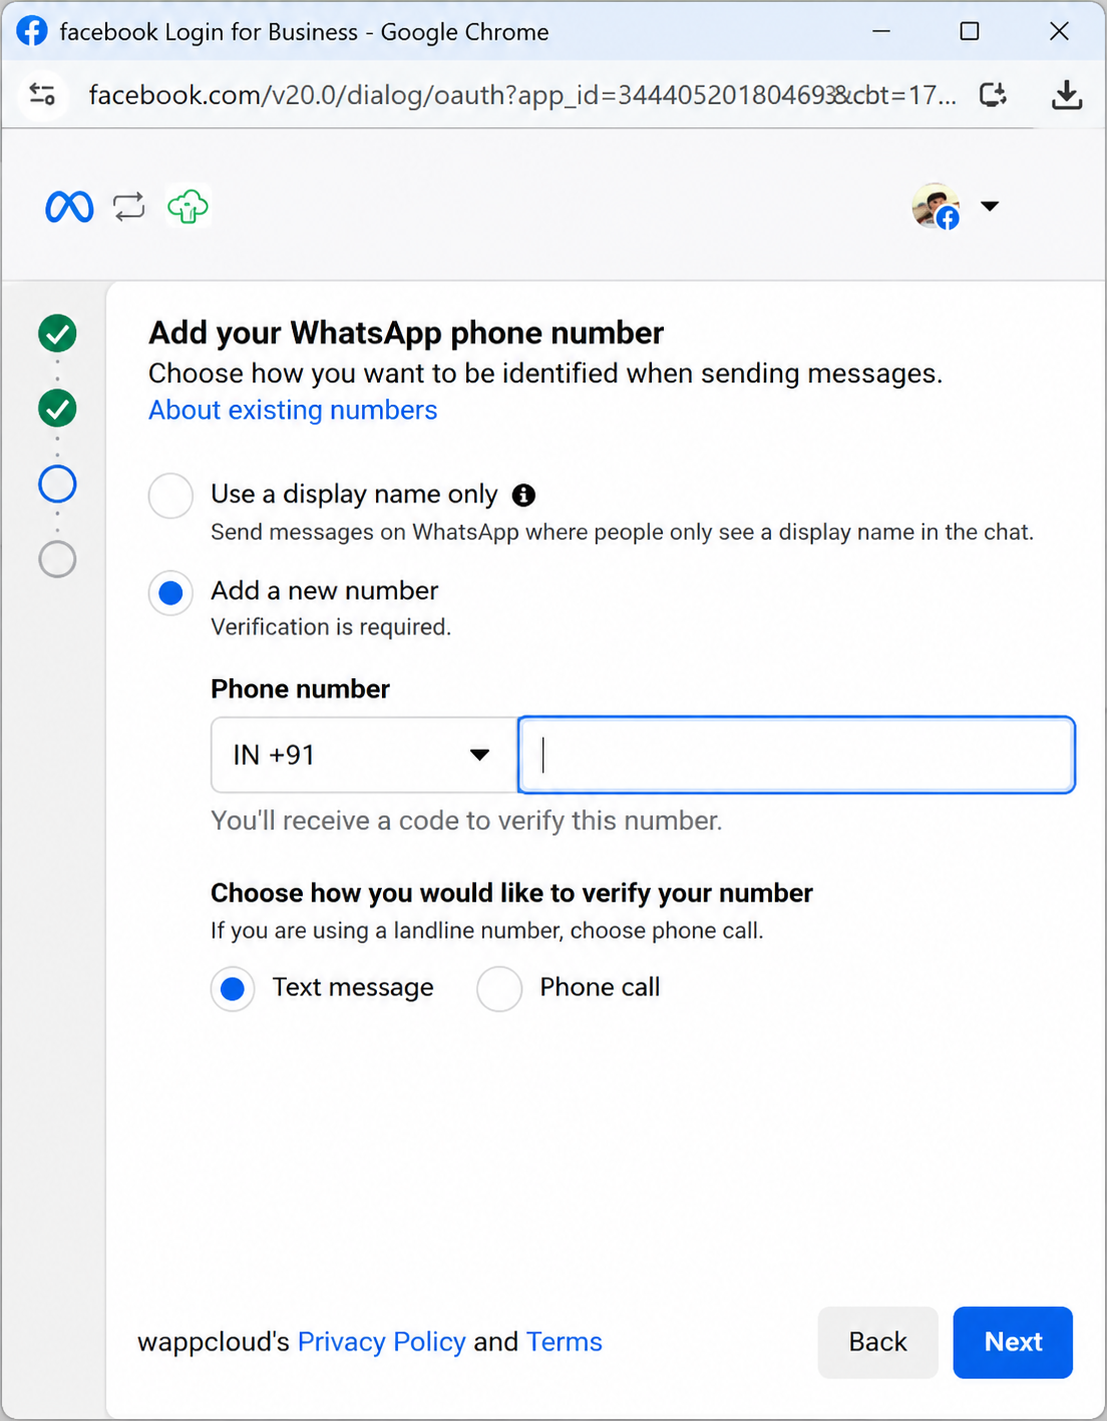
Choose how your WhatsApp account will be set up:
| Option | Description |
|---|---|
| Option A | Use Display Name Only — no phone number required at this stage. |
| Option B | Add a New Phone Number (Recommended) — select your country code (e.g., +91 for India) and enter your phone number. |
Note: The number must NOT already be registered on WhatsApp. If previously used on WhatsApp, the number must be properly disconnected before proceeding.
- Choose a verification method: Text Message (SMS) or Phone Call.
- Click “Next” to continue.
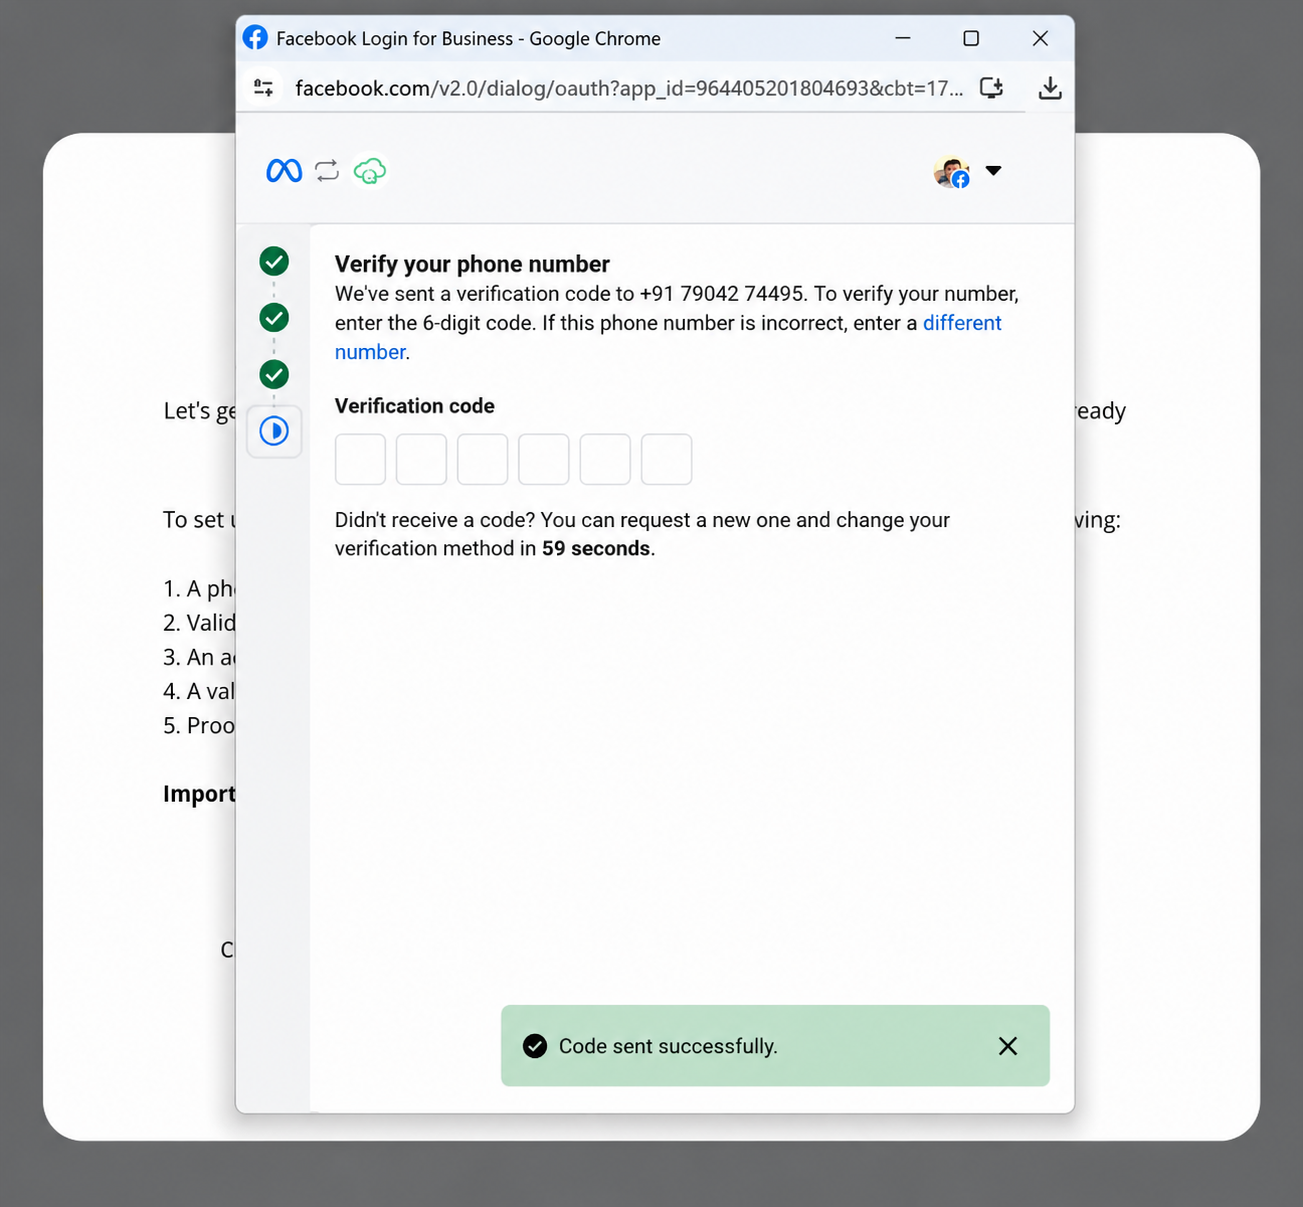
(v) Verify Your Phone Number
-
A 6-digit verification code will be sent via the method you selected.
-
Enter the 6-digit code in the field provided.
-
Click “Next” to confirm.
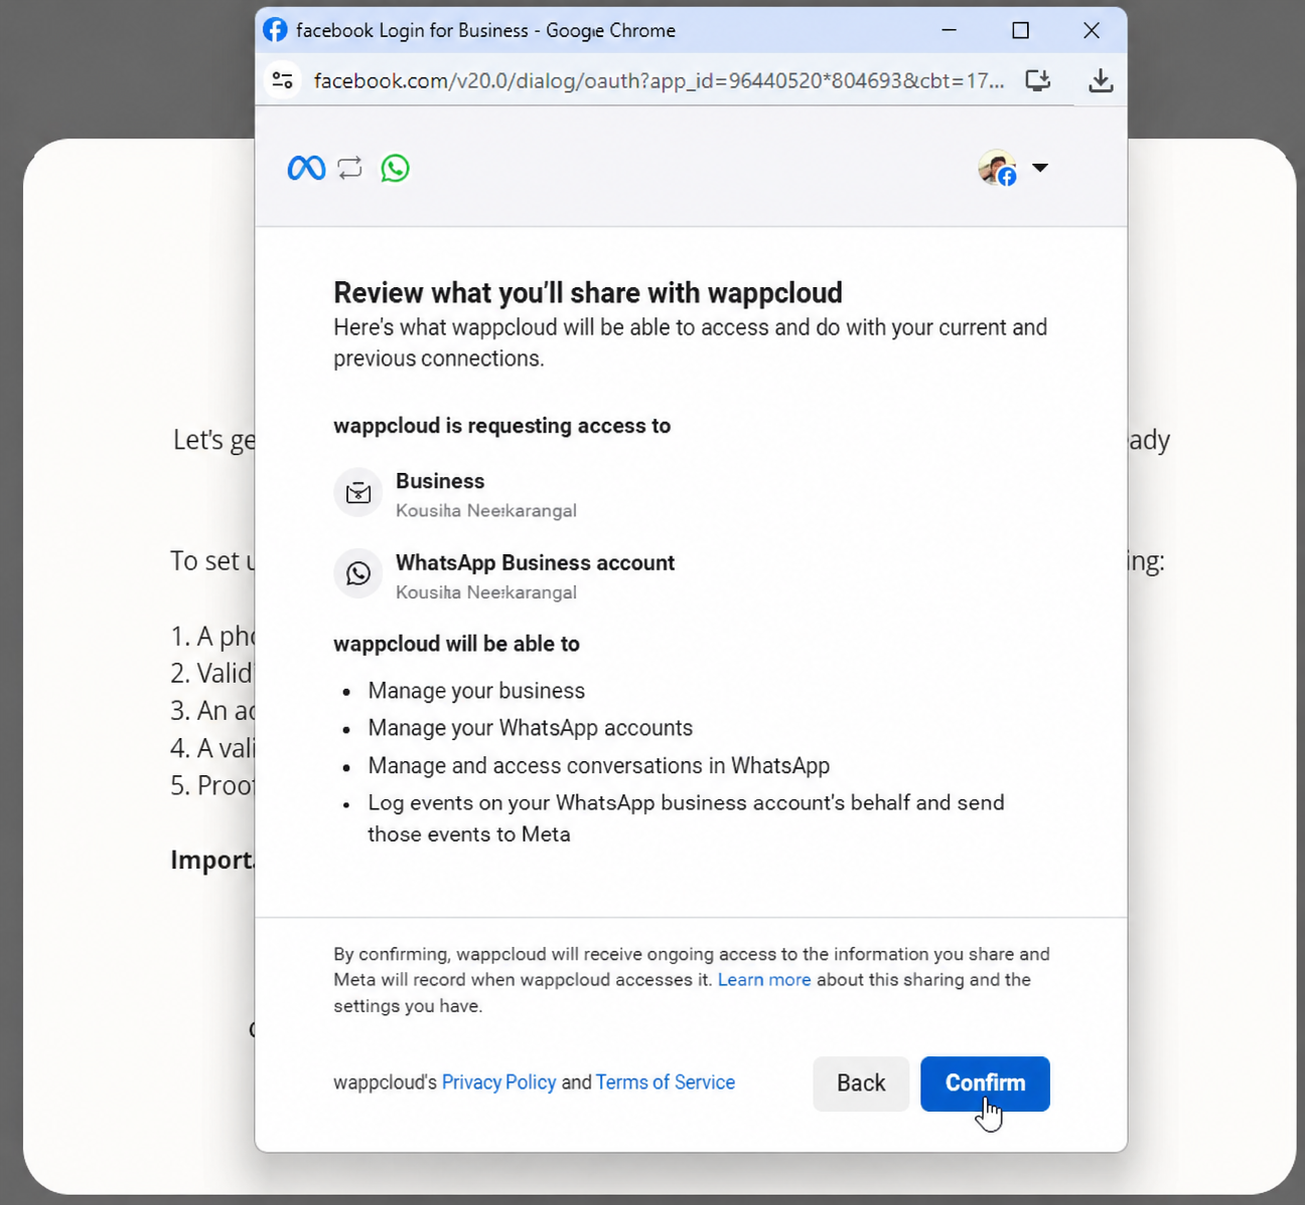
(vi) Grant Access to WappCloud
-
Review the permissions requested by WappCloud.
-
Confirm that the correct Business Portfolio and WhatsApp Business Account are selected.
-
Click “Confirm” to proceed.
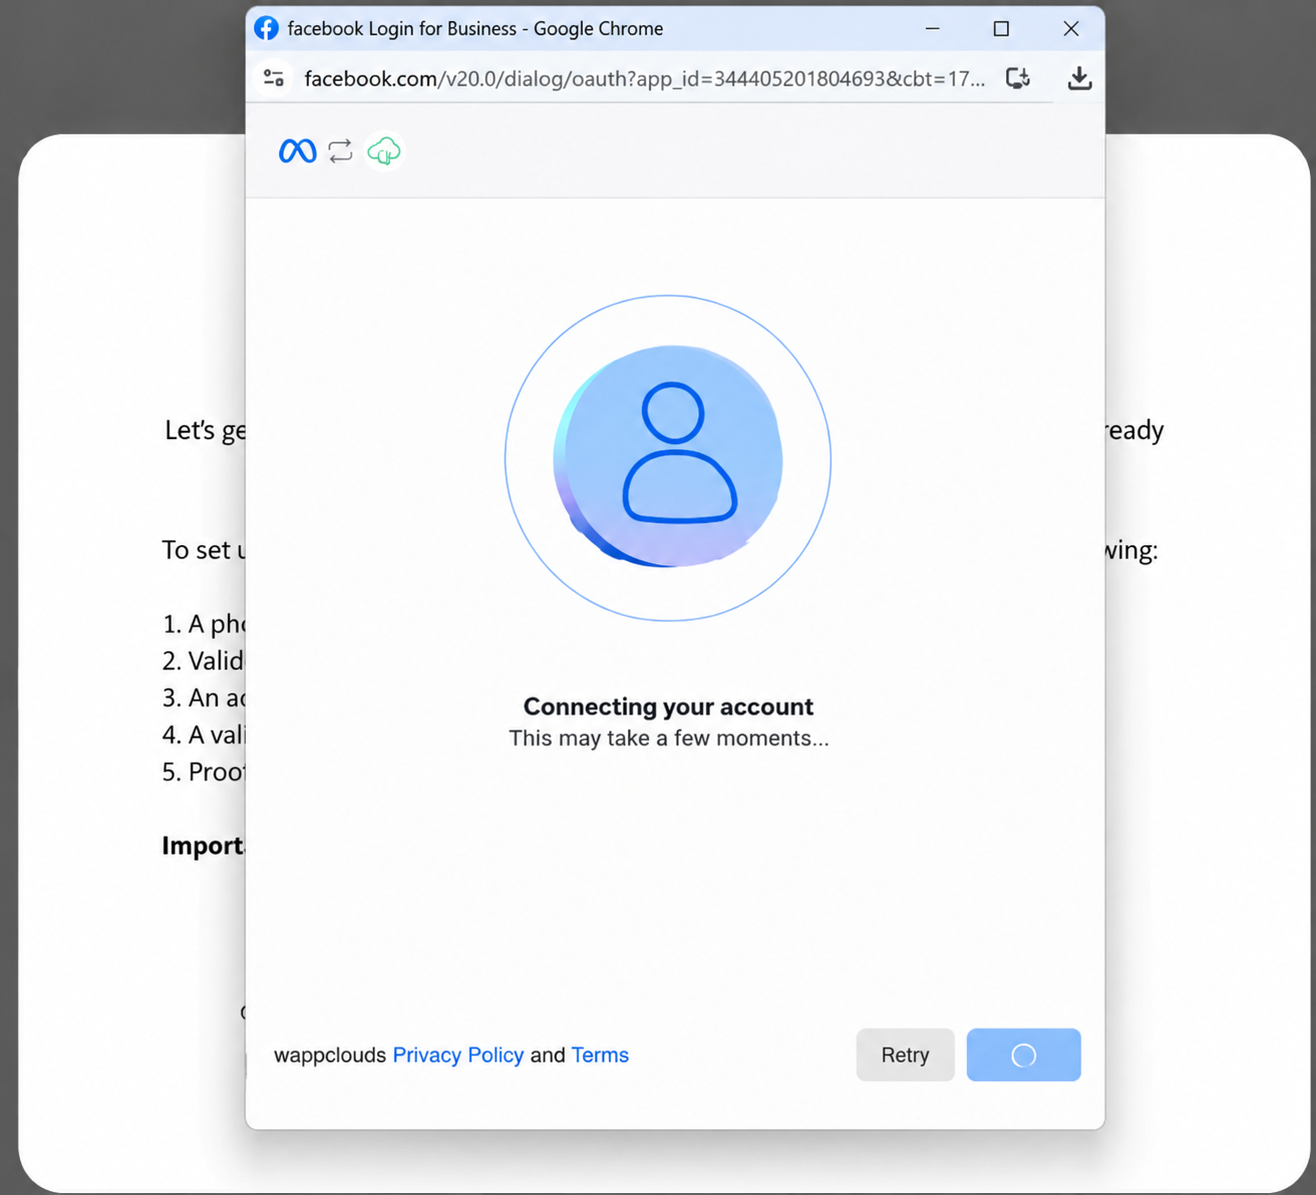
(vii) Connecting Your Account
Please wait while Meta securely connects your WhatsApp Business account with WappCloud. This process may take a few moments.
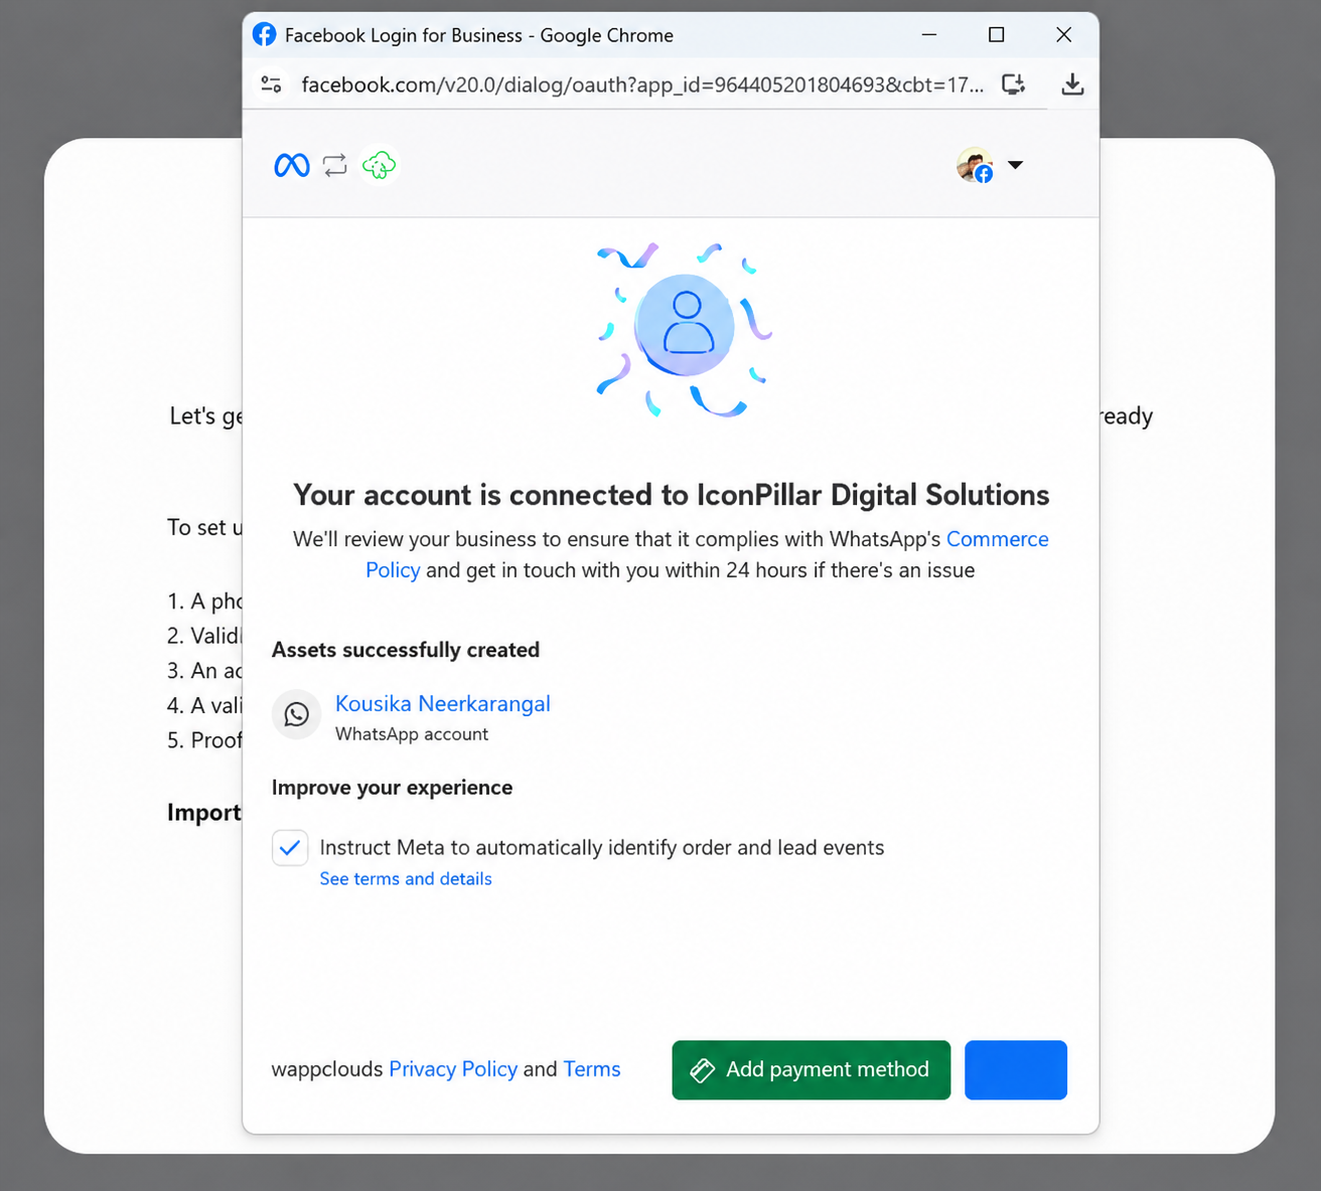
(viii) Complete the Connection
-
Your WhatsApp Business account has been successfully connected to WappCloud.
-
Review the connection details displayed on the screen.
-
Click “Finish” to complete the setup.
(ix) Wait for Connection Confirmation
After returning to the WappCloud page, please wait approximately 2 minutes. A success notification will appear once your WhatsApp API setup is confirmed.
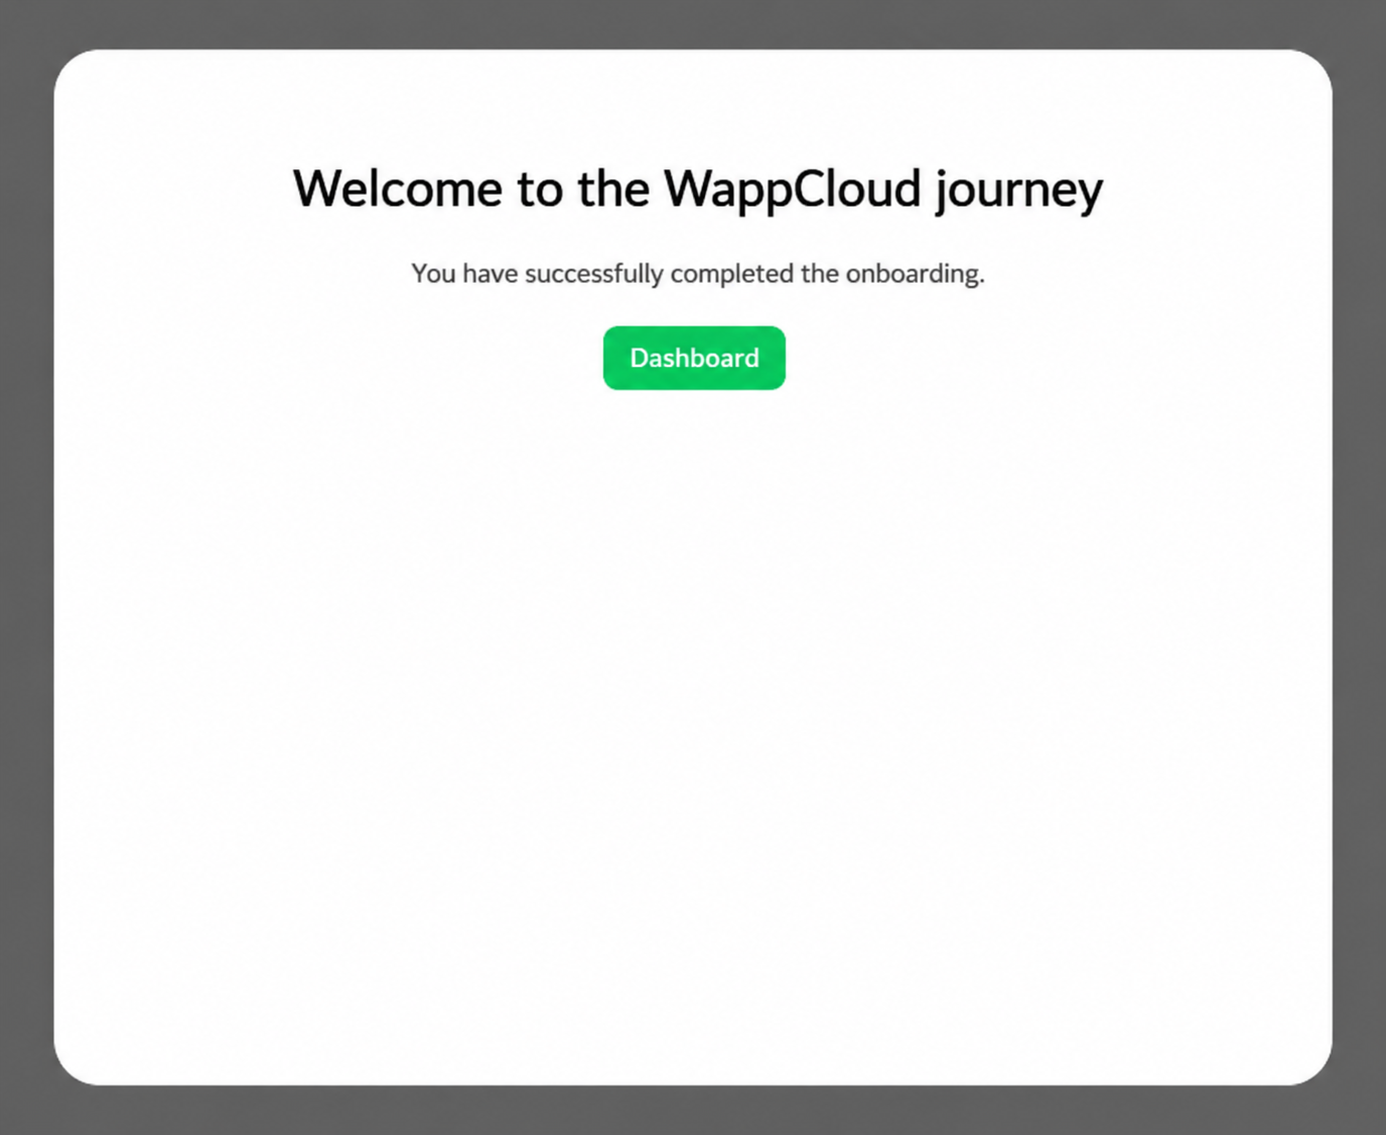
(x) Onboarding Complete
Your WhatsApp API onboarding has been completed successfully.
- Click “Dashboard” to start using WappCloud.
STEP 6 — Configure WhatsApp Manager & Payment Settings
Now that your WhatsApp account is connected, you need to complete your WhatsApp Business profile and set up a payment method through Meta Business Suite.
Navigate to: business.facebook.com
Part A — WhatsApp Manager: Update Your Profile
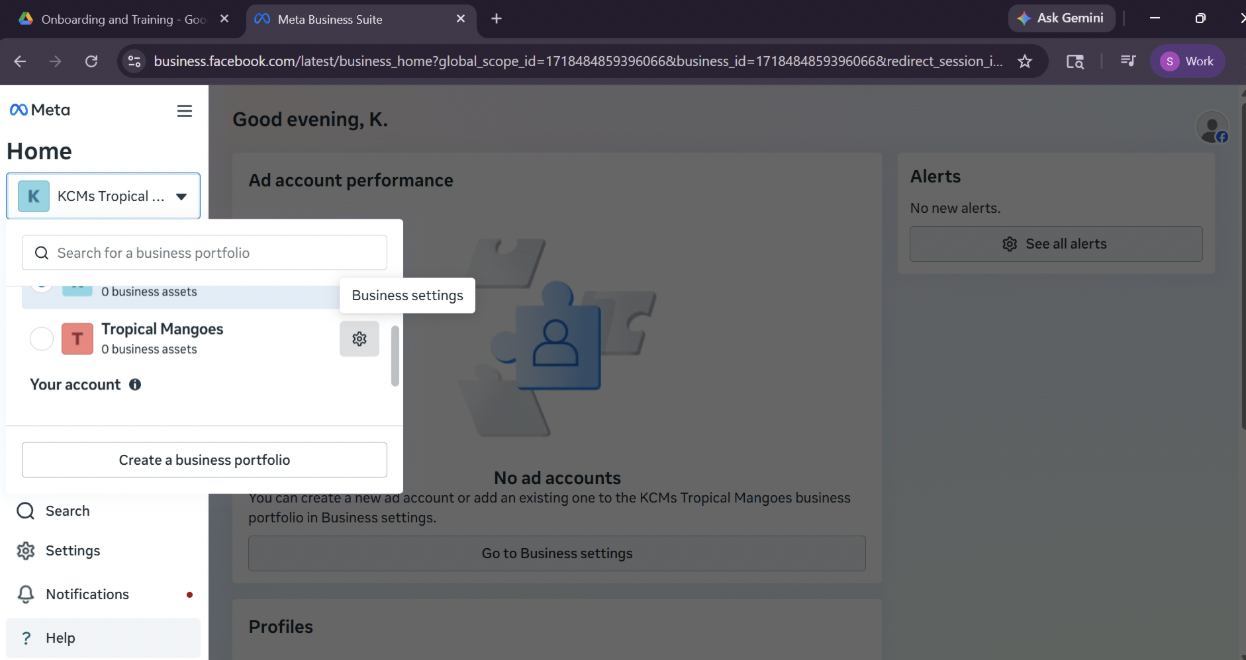
-
Select the Business Portfolio that was linked during setup.
-
Click the “Settings” icon.
-
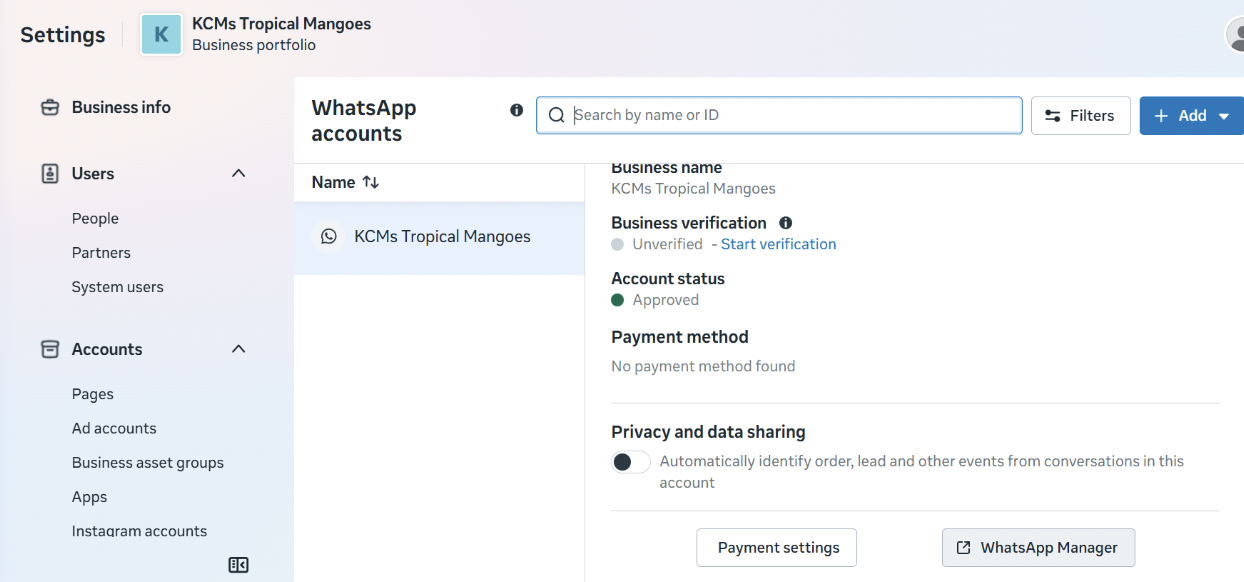
Under “Accounts”, select “WhatsApp Accounts”.
-
Click “WhatsApp Manager” and add the following profile information:
| Field | Details |
|---|---|
| Profile Image | Upload your business logo or profile photo |
| Address | Your registered business address |
| Email Address | Your business contact email |
| Description | A brief description of your business and services |
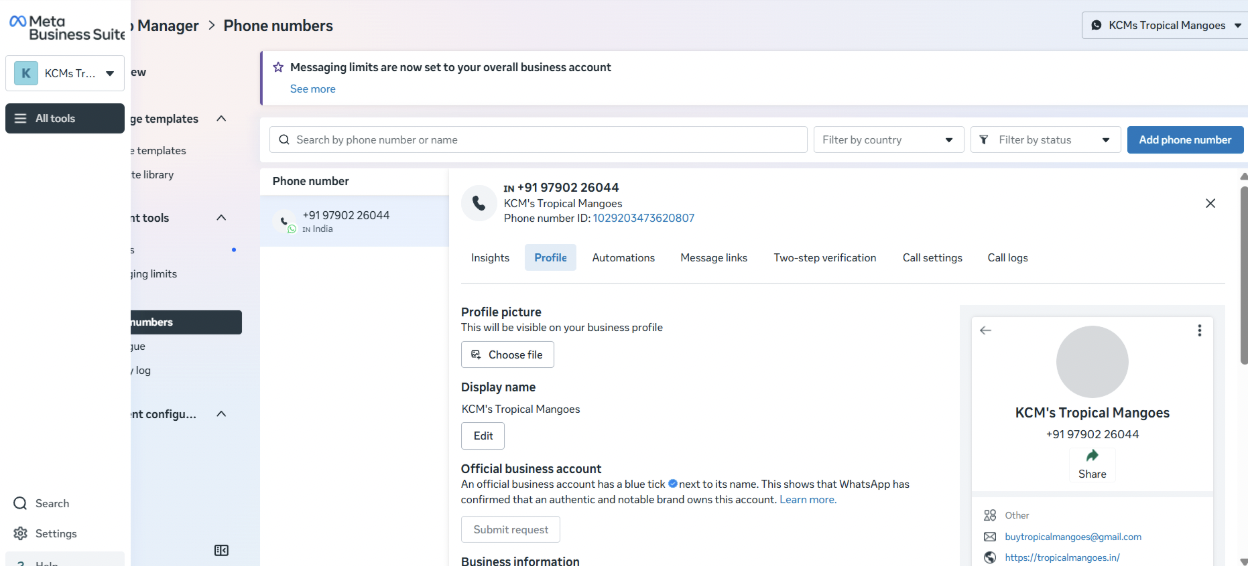
Click “Save” once all profile details are filled in.
Part B — Payment Settings
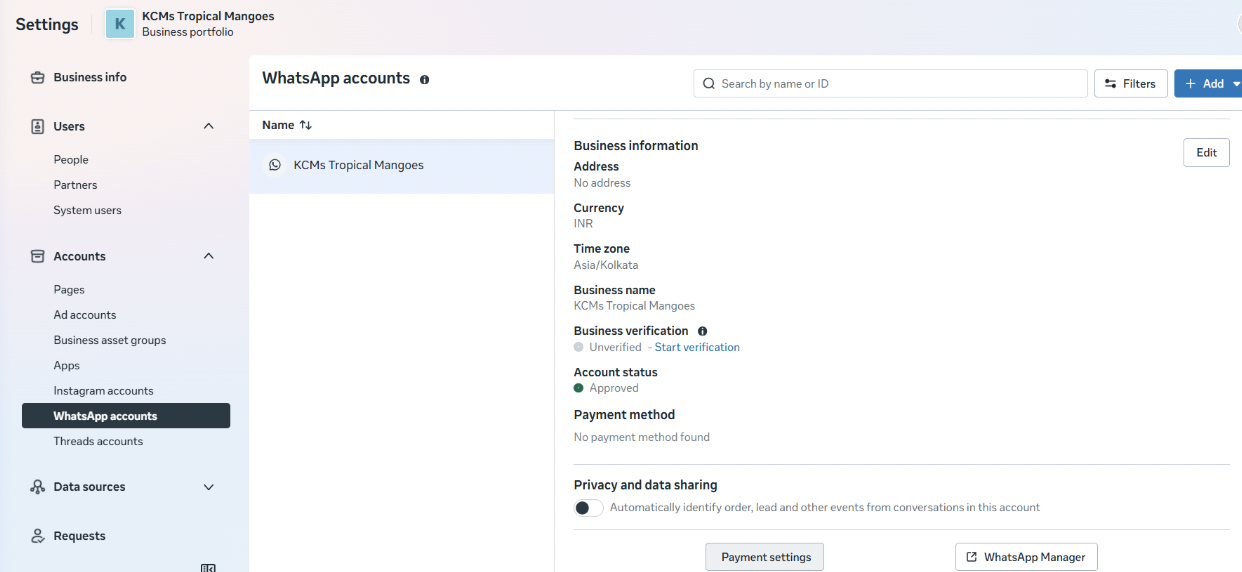
Click “Payment Settings” and complete the following two sections:
i. Business Information
-
Click “Edit” under Business Information.
-
Enter the following details:
-
Currency and time zone
-
Business name
-
Business address
-
GST number (if applicable)
-
-
Click “Save” to confirm.

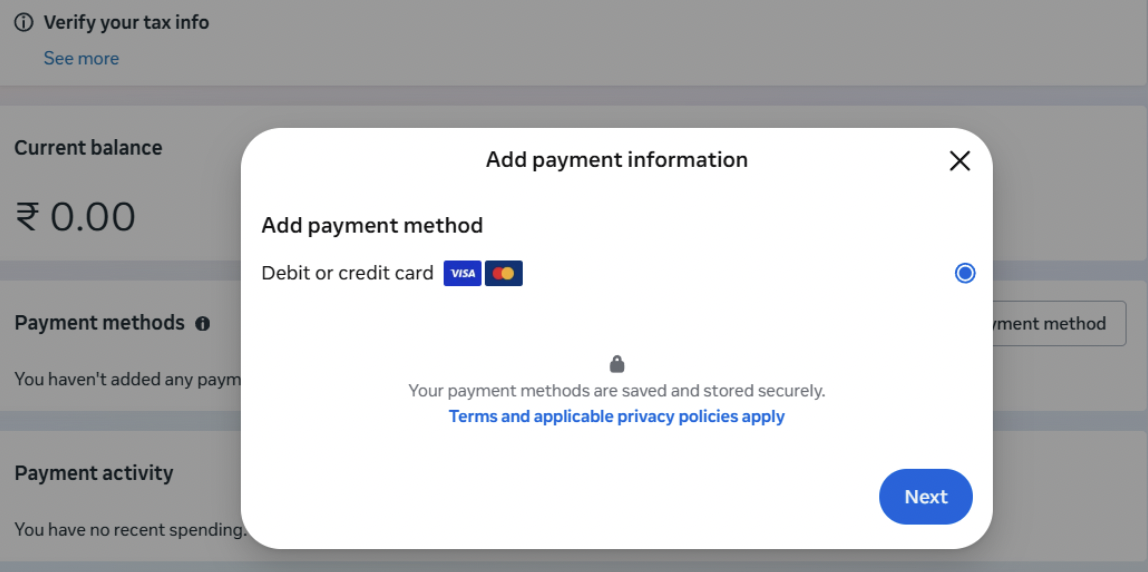
ii. Payment Method
-
Select “Debit or Credit Card” and click “Next”.
-
Enter the following card details:
| Field | Details |
|---|---|
| Name on Card | As it appears on your card |
| Card Number | 16-digit card number |
| Expiry Date | MM/YY format |
| CVV | 3 or 4 digit security code |
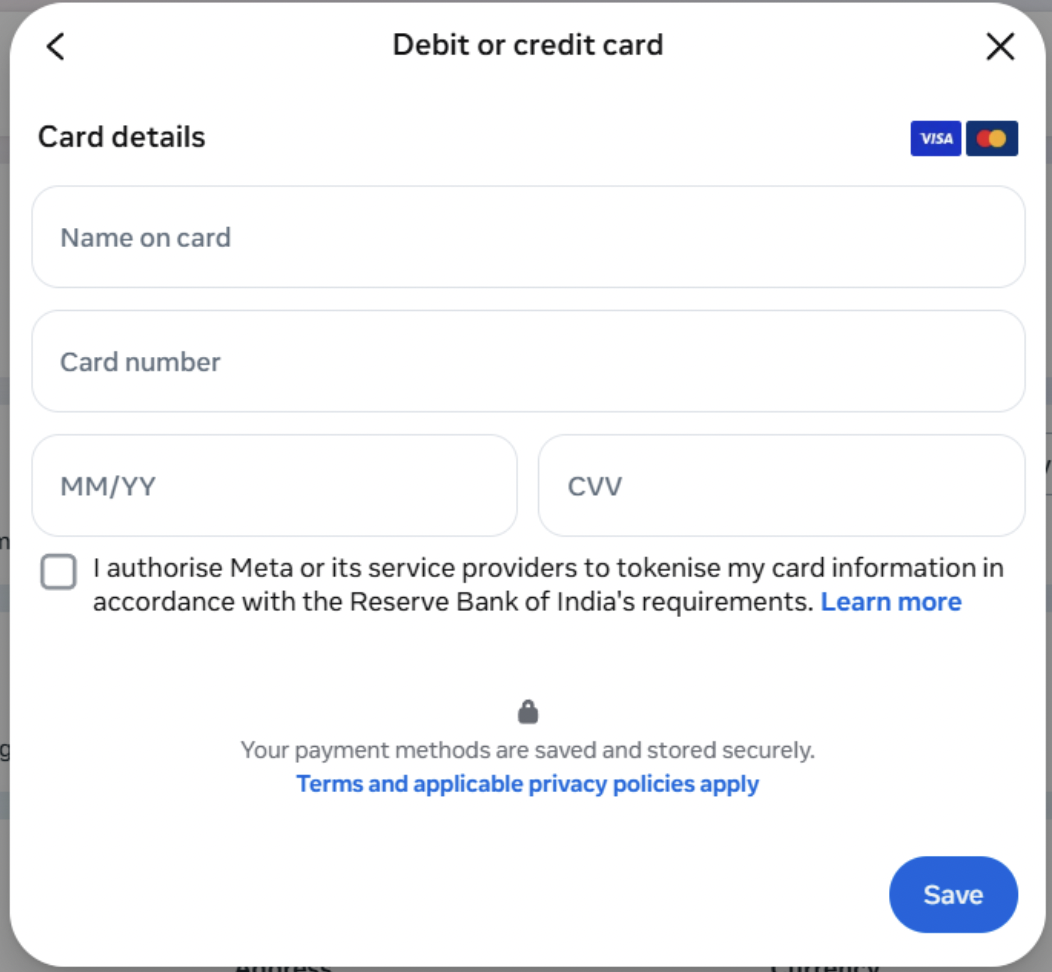
-
Click “Next” and enter the OTP received to verify your card.
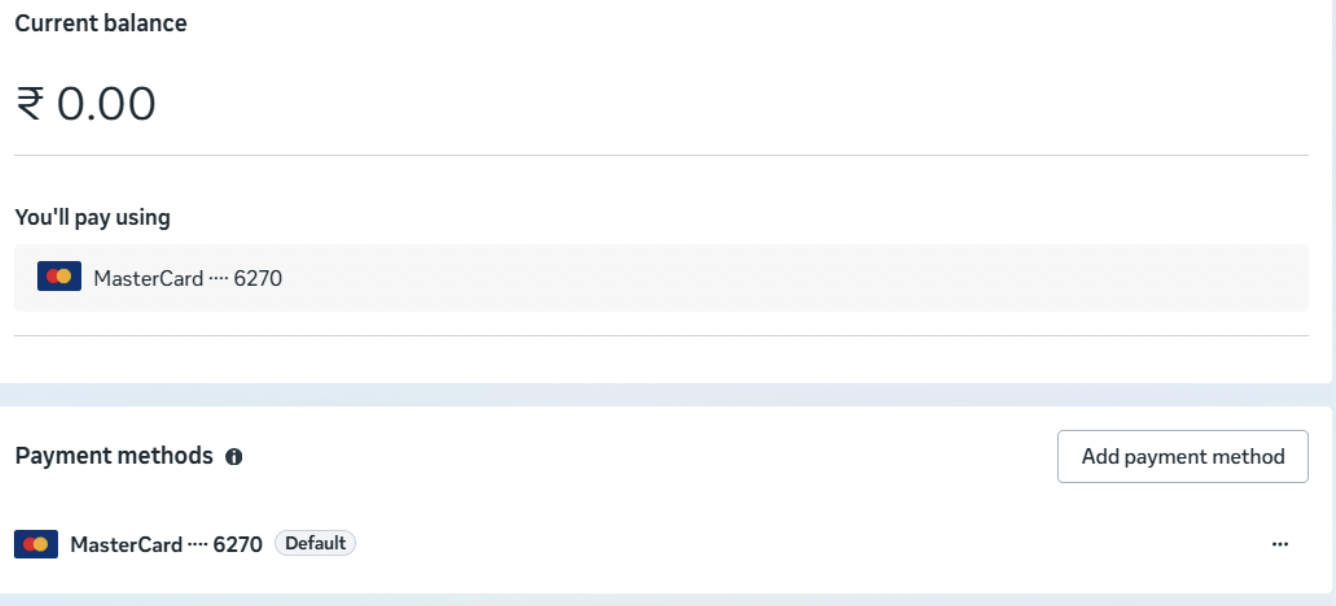
-
Once the card has been verified the payment method must be made as default, by clicking on the 3 dots below add payment method option and select set as default.
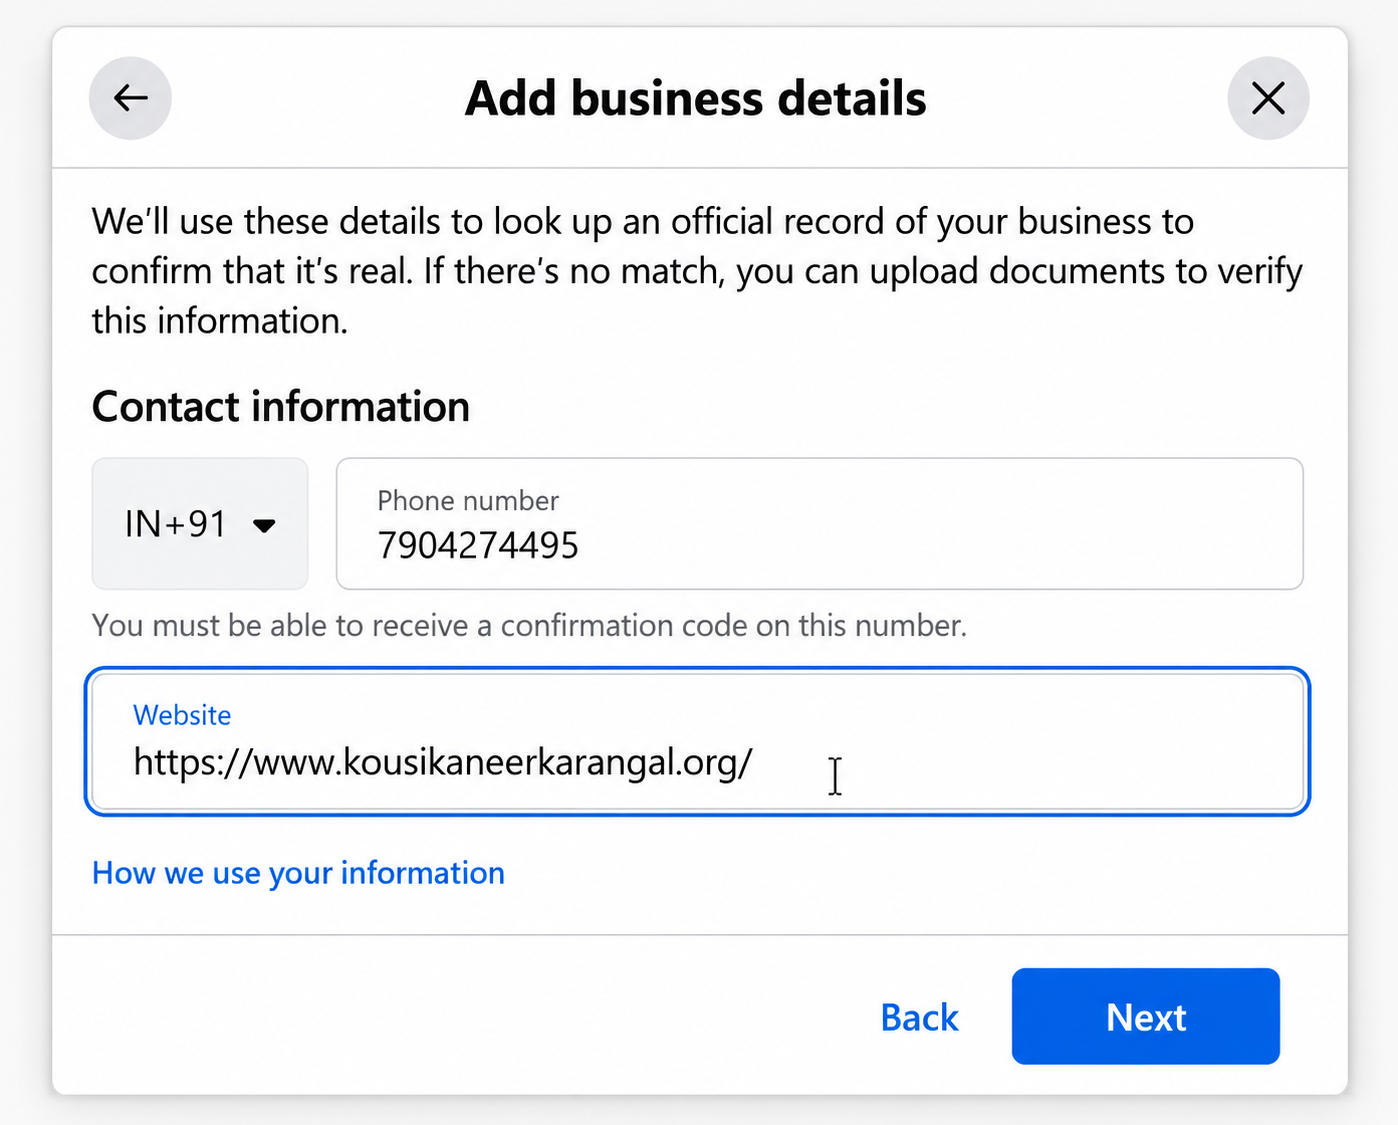
STEP 7 — Business Verification
Business verification is required by Meta to confirm the legitimacy of your business. Completing this step unlocks higher messaging limits and additional WhatsApp Business API features.
Verification Process
-
Go to business.facebook.com and select your linked Business Portfolio.
-
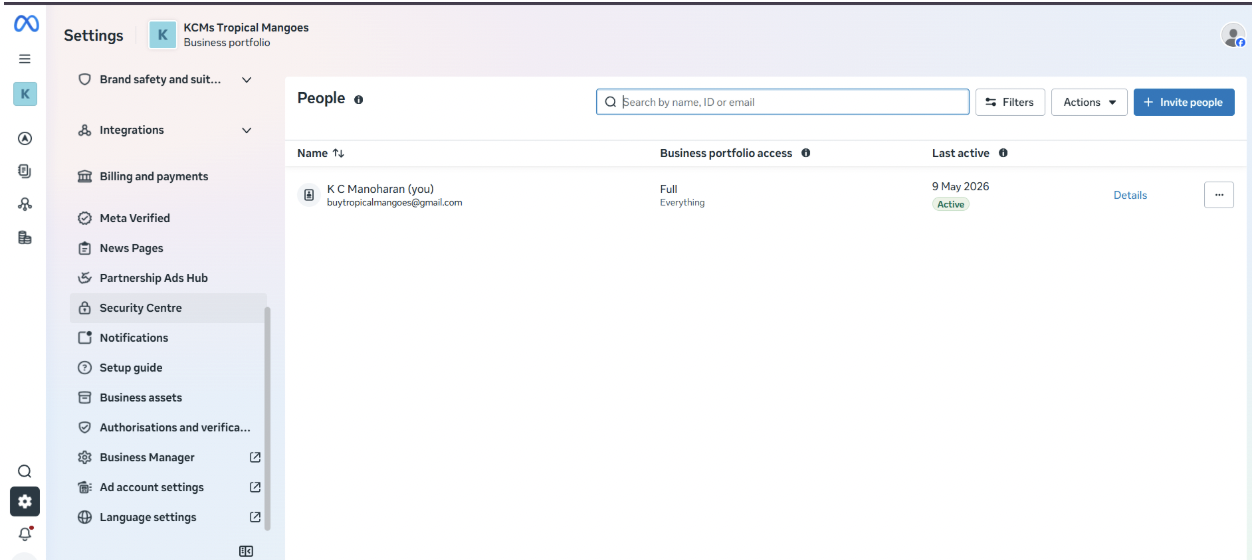
Navigate to “Security Center”.
-
Click “Start Verification”.
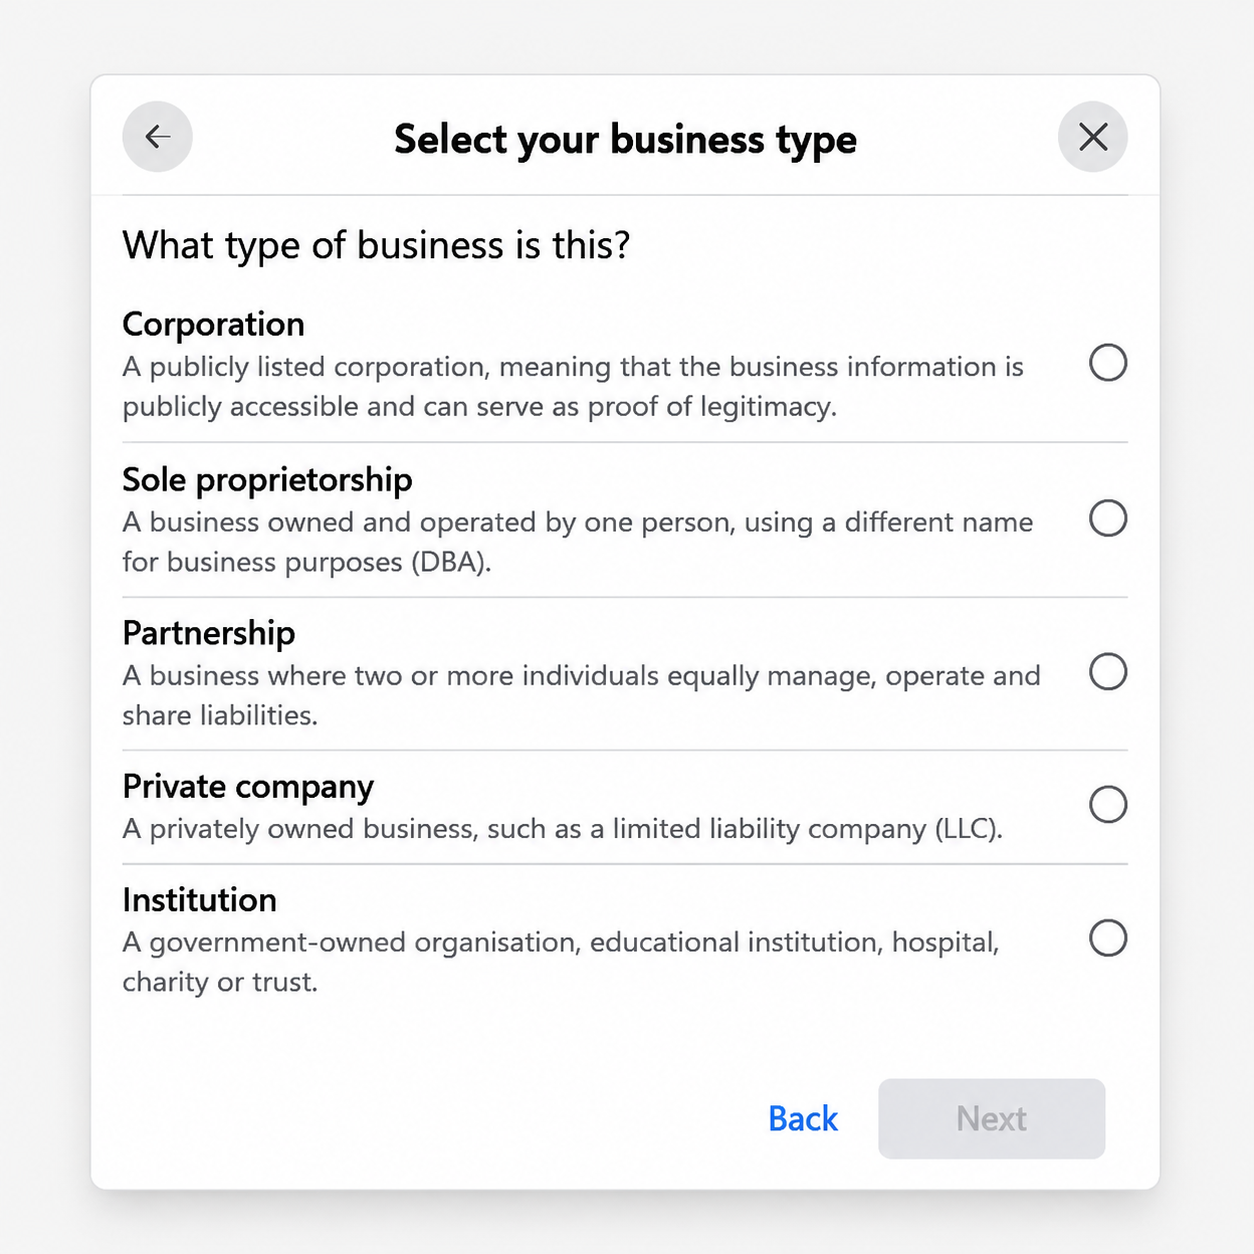
- Select your business type from the dropdown menu.
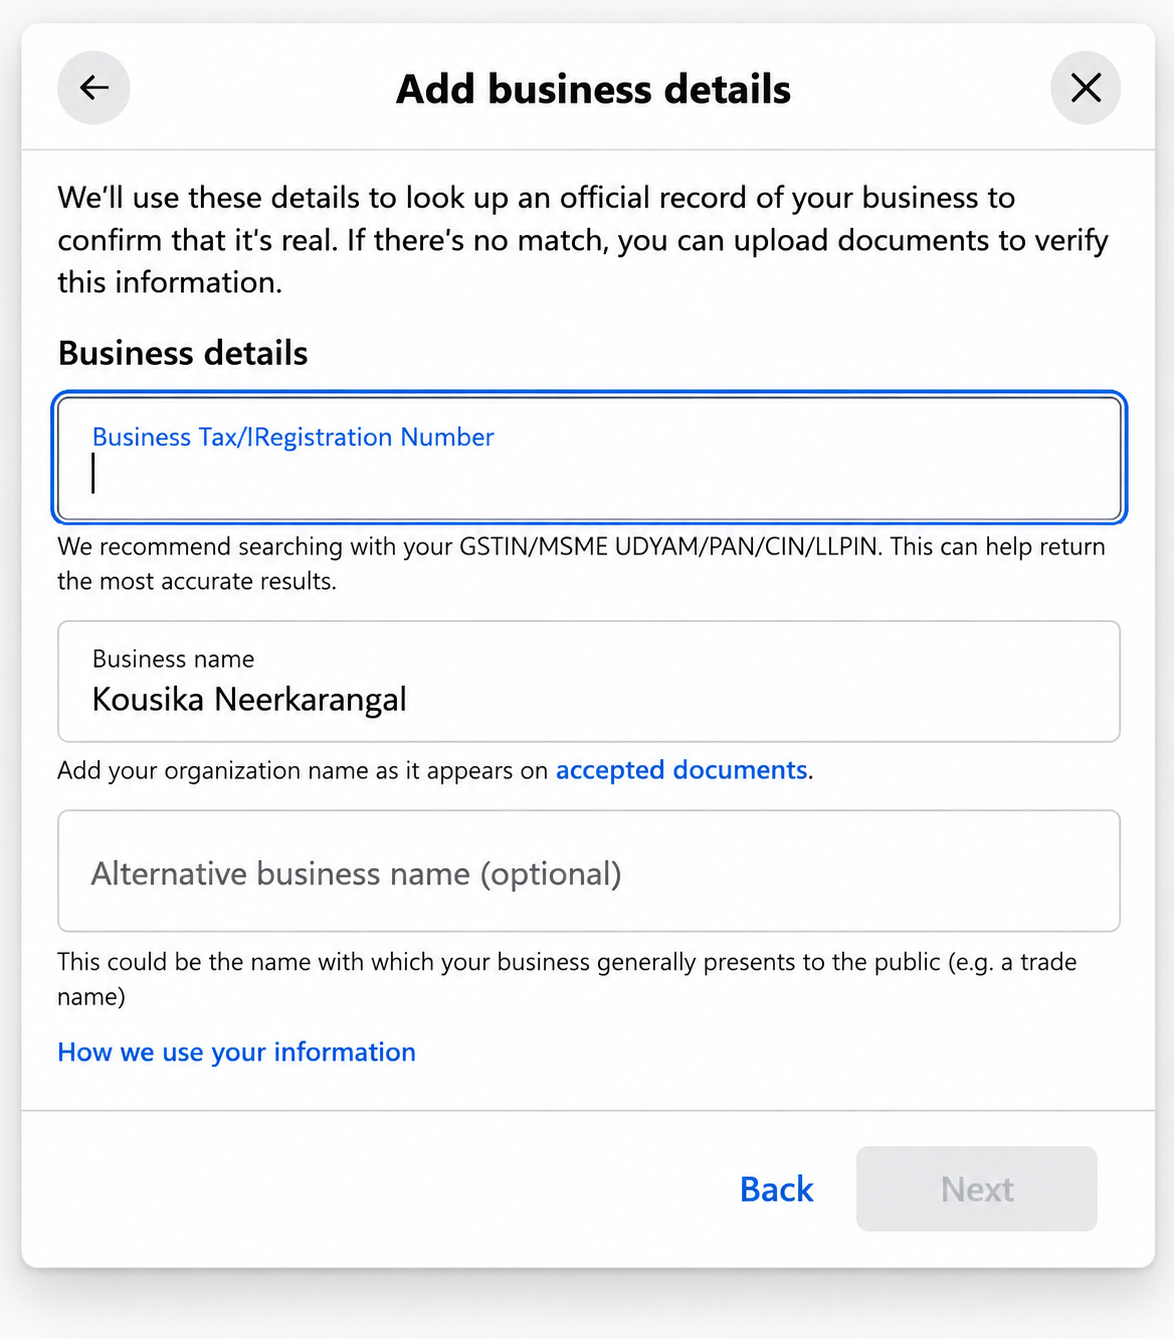
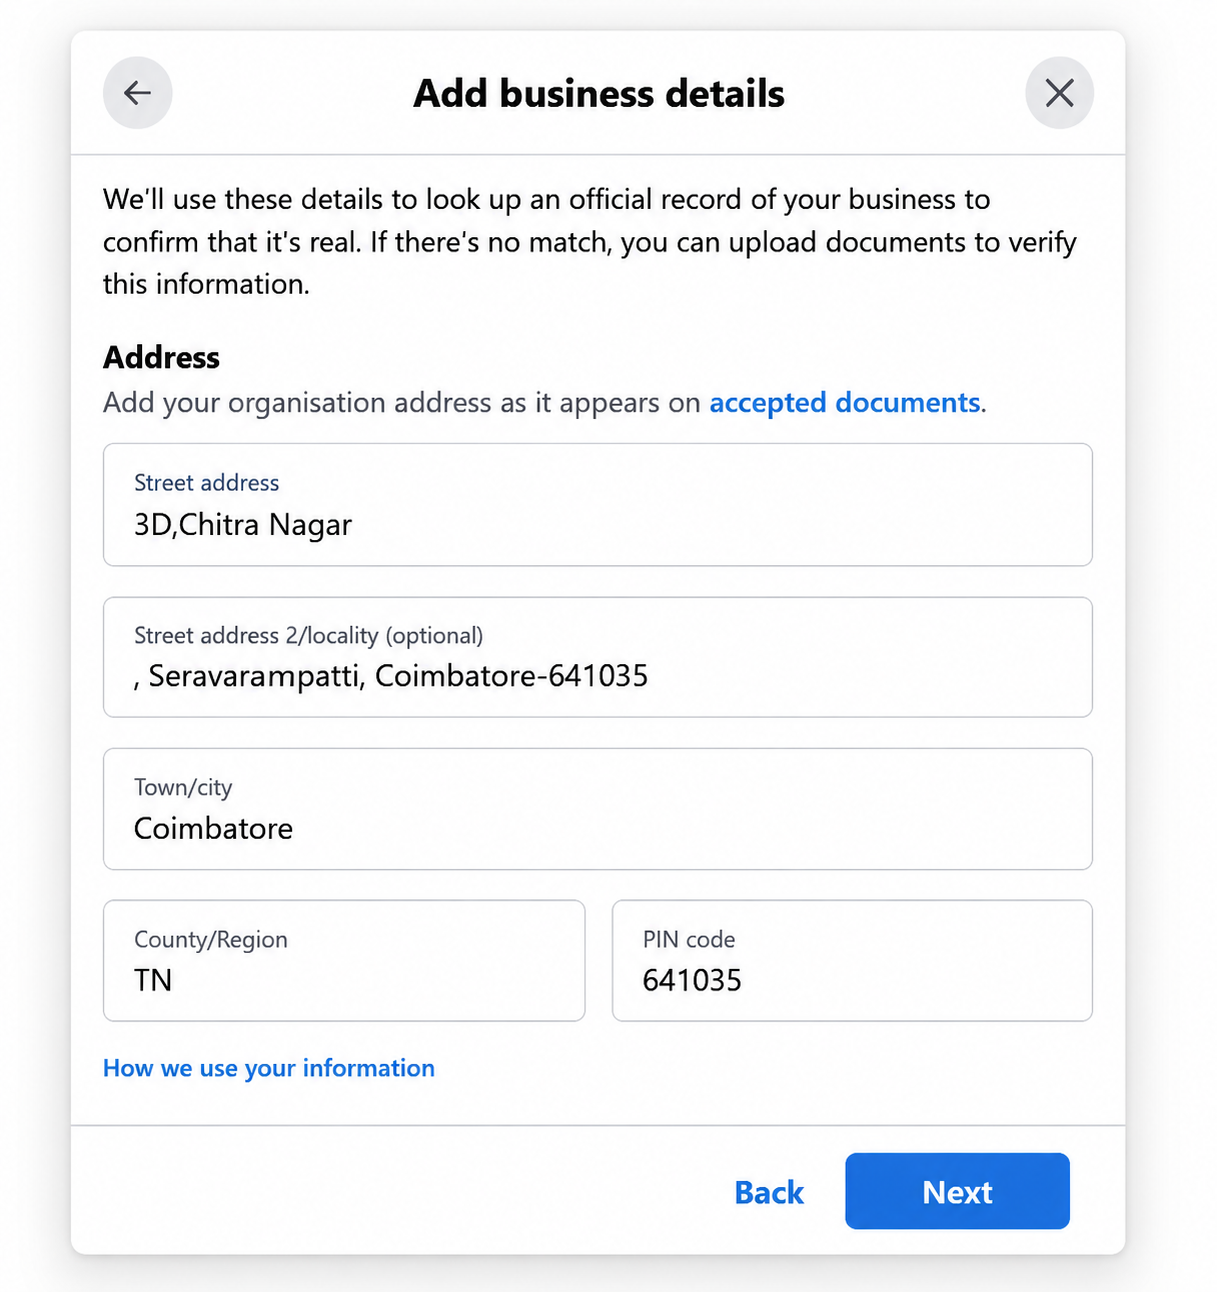
- Enter the required business details:
| Field | Details |
|---|---|
| Tax ID | GST number, Udyam registration, PAN, or CIN |
| Business Name | As it appears on your GST or Udyam certificate |
| Business Address | Registered business address |
| Contact Phone Number | The number linked to your official business documents |
- Select your business from the list displayed.
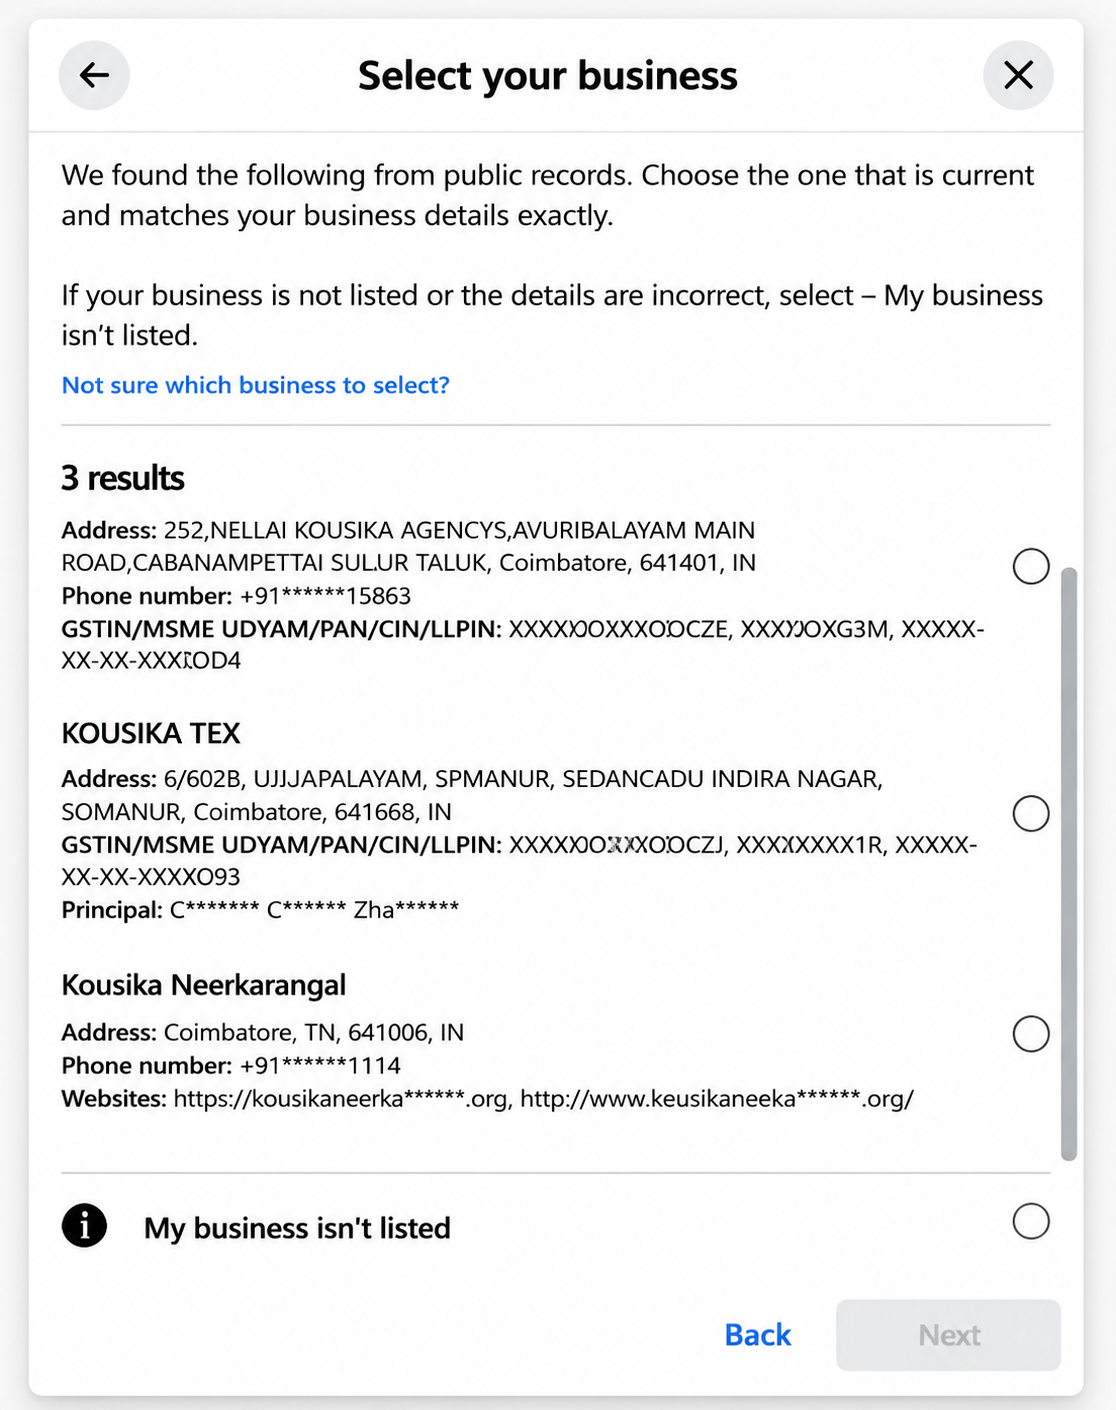
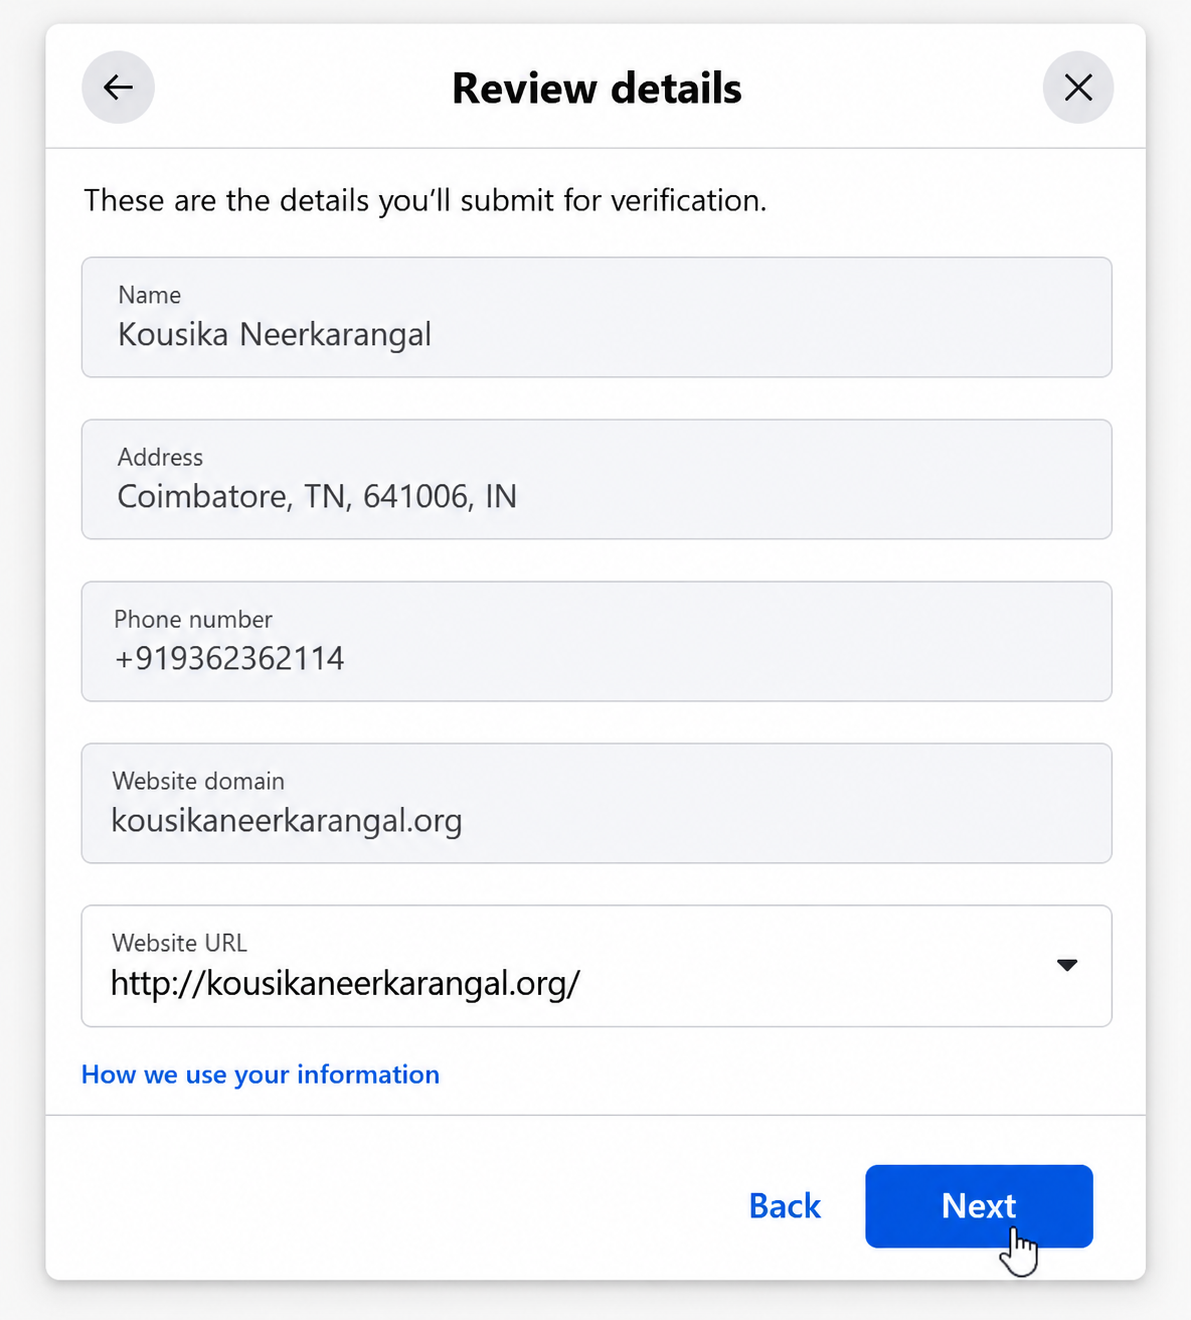
- Review all entered details for accuracy.
-
Choose your preferred OTP delivery method:
-
Phone Call
-
SMS
-
Email
-
WhatsApp
-
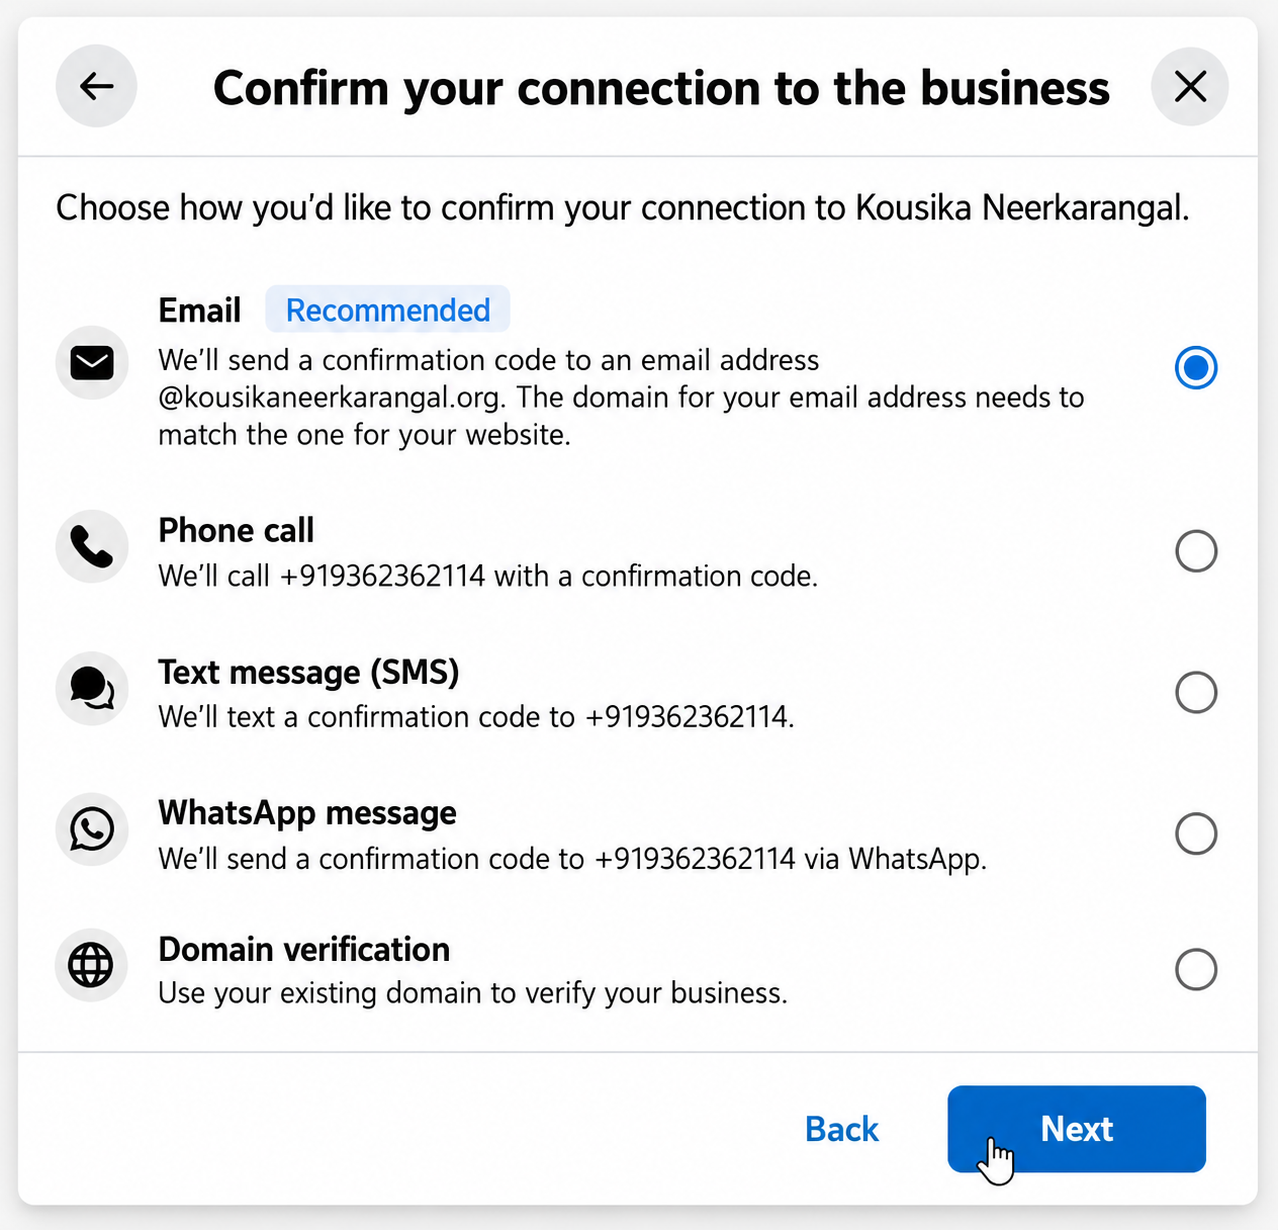
-
Confirm the phone number or email address where the OTP will be sent.
-
Enter the OTP and click “Next”. Your verification request will be submitted.

Note: After submission, Meta will review your business details. The verification process typically takes between 24 and 48 hours. You will be notified once the review is complete.
Onboarding Complete
You have successfully completed the WappCloud onboarding process. Your WhatsApp Business API is now active and ready to use.
For any assistance, please contact the WappCloud support team through your dashboard.