Shopify Integration
Connect your Shopify store to WappCloud to automatically send WhatsApp notifications to your customers whenever something happens to their order — it’s created, updated, paid, or fulfilled. Once it’s set up, you don’t need to send these messages manually — WappCloud picks up the order details from Shopify and fills them into your WhatsApp template on its own.
Step 1: Connect Your Shopify Store
Go to Integration > Shopify from the left-hand menu.
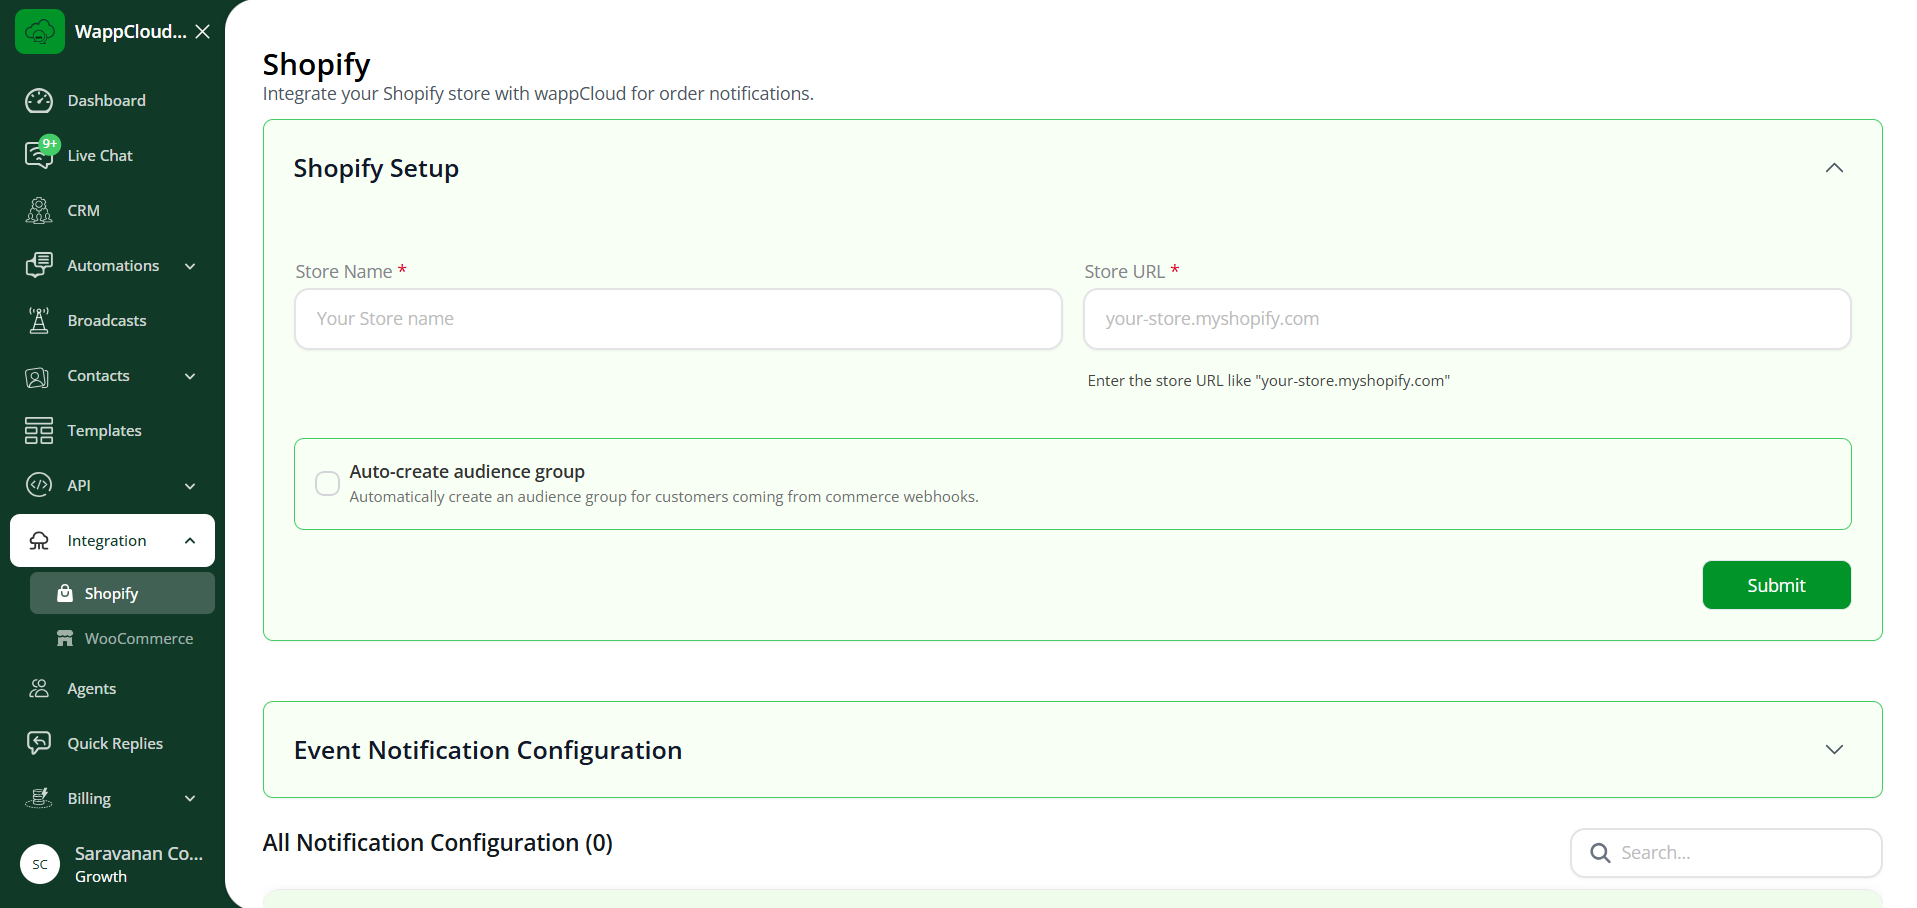
- Store Name – Enter a name for your store (used only inside WappCloud to identify it, e.g. “My Fashion Store”).
- Store URL – Enter your Shopify domain in the format
your-store.myshopify.com. - Auto-create audience group – Turn this on if you want WappCloud to automatically group customers who place orders through this store into a contact/audience group, so you can target them later with broadcasts. Leave it off if you don’t need this.
- Click Submit to save your store details.
Note: You only need to do this once per store. After this, you’ll see an Event Notification Configuration section appear below, where you set up what messages get sent and when.
Step 2: Choose Which Order Events Should Trigger a Message
Expand Event Notification Configuration and click Add (or the equivalent action) to create a new notification rule. You’ll be asked to pick an Event Type.
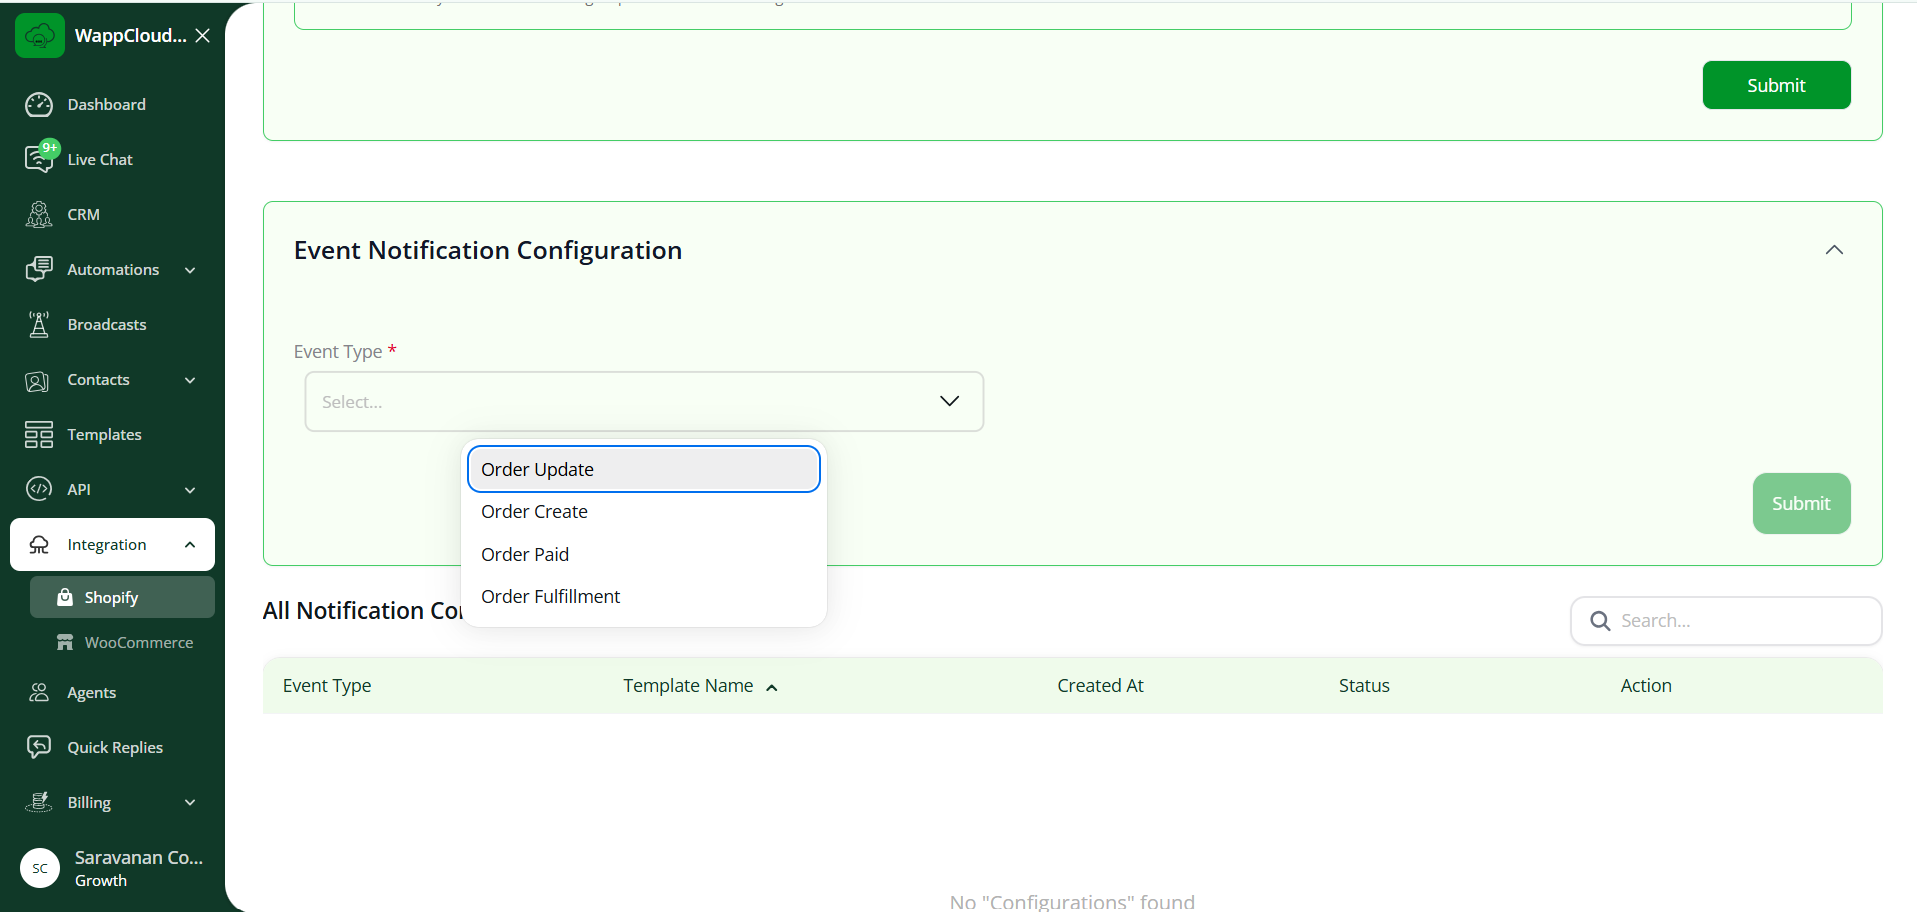
Shopify can notify WappCloud about the following order events:
| Event Type | When it happens |
|---|---|
| Order Create | A new order is placed on your store. |
| Order Update | Something on an existing order changes (e.g. shipping address, items, status). |
| Order Paid | The customer’s payment for the order is successfully received. |
| Order Fulfillment | The order has been packed/shipped and marked as fulfilled. |
Pick the event you want to send a WhatsApp message for. You can set up a separate WhatsApp template for each event — for example, one message for “Order Paid” and a different one for “Order Fulfillment”.
Step 3: Pick a Template and Fill In the Dynamic Fields
Once you’ve chosen an event type, select the WhatsApp template you want to send for it.
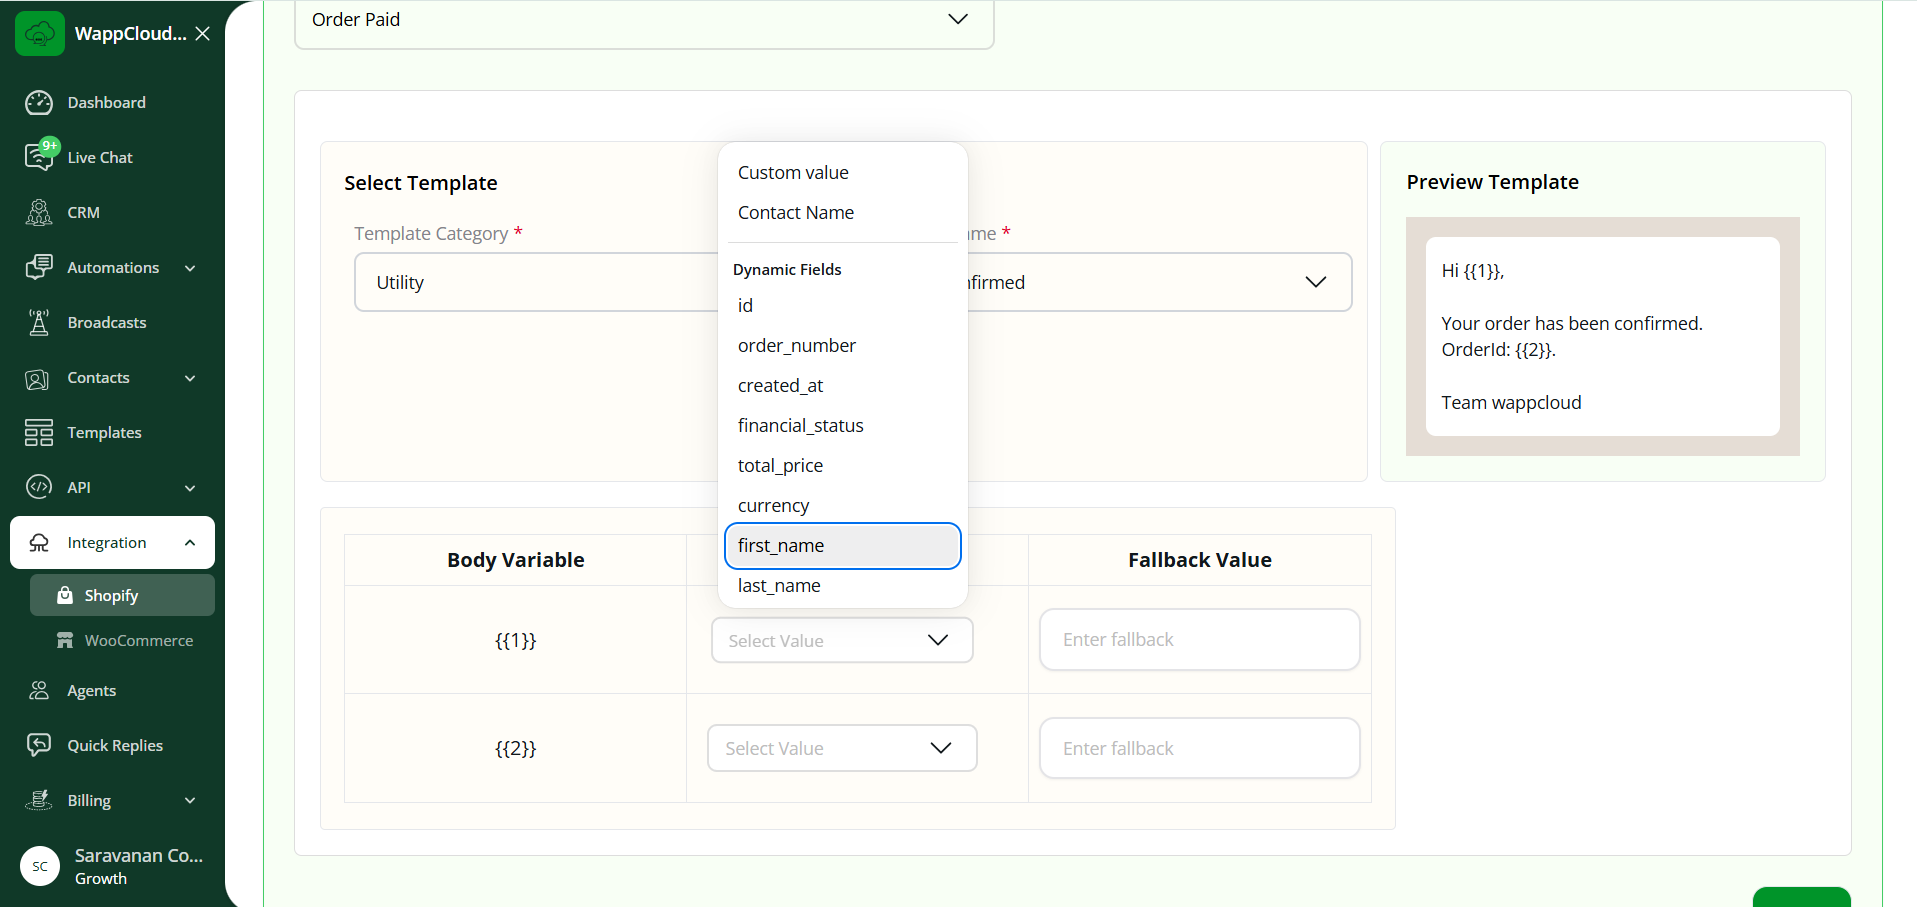
Your template body will usually have one or more placeholders like {{1}}, {{2}} (these are added when you create the template). For each placeholder, you choose what information from the order should automatically fill that spot — this is what the Dynamic Fields dropdown is for.
What are “Dynamic Fields”?
Think of Dynamic Fields as fill-in-the-blanks that WappCloud fills for you, using the actual order’s details — you never have to type them in yourself. For example, if your message says:
Hi {{1}}, your order #{{2}} has been confirmed.You can map {{1}} to the customer’s first_name and {{2}} to the order’s order_number. Every time an order comes in, WappCloud automatically replaces {{1}} and {{2}} with that specific customer’s name and order number — so each customer gets a personal message without you doing anything manually.
Available options in the dropdown include:
- Custom value – A fixed piece of text you type yourself (same for every message, doesn’t change per order).
- Contact Name – The name saved against the contact in WappCloud.
- Dynamic Fields (from the order):
id– The internal order ID.order_number– The order number shown to the customer (e.g. #1234).created_at– The date and time the order was placed.financial_status– Payment status of the order (e.g. paid, pending, refunded).total_price– The total order amount.currency– The currency the order was placed in.first_name– The customer’s first name.last_name– The customer’s last name.full_name– The customer’s first and last name combined, so you don’t need two separate placeholders just for the name.
You also have a Fallback Value column next to each field — this is what gets shown if that particular piece of information happens to be missing on an order (for example, if a guest checkout didn’t provide a last name). Setting a sensible fallback (like “Customer”) avoids a message going out with a blank space in it.
The Preview Template panel on the right always shows you exactly how the final message will look before you save it.
Step 4: Save and Go Live
Once every placeholder has a value (or fallback) assigned, click Submit. The rule now appears in All Notification Configuration with an Active status, and from that point on, WappCloud will automatically send this WhatsApp template whenever the selected Shopify event happens — no manual work needed on your end.
Tip: You can create multiple rules for the same store — one per event type — and you can edit or delete a rule any time from the Action column in the notification list.
Step 5: Set Up Webhooks in Shopify
For WappCloud to actually receive order events from your store, you need to register webhooks on the Shopify side that point to WappCloud’s webhook endpoint.
- In your Shopify Admin, go to
https://admin.shopify.com/store/your-store-name/settings/notifications/webhooks(or navigate to Settings > Notifications from the sidebar and scroll down to Webhooks). - Click Create webhook.
- Create a webhook for each of the following events, using the same configuration each time:
| Field | Value |
|---|---|
| Event | Order creation / Order payment / Order fulfillment |
| Format | JSON |
| URL | https://ecomm-integration.wappcloud.com/webhook |
You need to create three separate webhooks in total, one for each event:
- Order creation – notifies WappCloud when a new order is placed.
- Order payment – notifies WappCloud when an order is paid.
- Order fulfillment – notifies WappCloud when an order is fulfilled.
For each one, select the event, set the format to JSON, enter the URL above, and click Save webhook.
Note: All three webhooks use the exact same URL — only the Event dropdown changes between them.